
# Calendar Pro Get Started Guide
Welcome to Calendar Pro, the shared calendar for Microsoft Teams. This guide walks you through adding Calendar Pro to a channel, creating your first event, inviting your team, and customizing the calendar so everyone stays in sync. 📅
# What is Calendar Pro?
Calendar Pro gives your team one shared space inside Microsoft Teams to schedule events, track availability, and coordinate work without switching apps. It supports multiple views, recurring events, tags, permissions, resource booking, printing, two-way sync with Outlook and Gmail, and automation through Power Automate.
You add Calendar Pro as a tab in any team channel or chat, so the calendar lives right next to the conversations it supports.
# Set up Calendar Pro
- 1
Add Calendar Pro to Microsoft Teams
- Open Microsoft Teams and click Apps (AppSource) in the left sidebar.
- Search for Calendar Pro.
- Click Add to a team.
- In Type a team or channel name, search for and select the target team or channel.
- Click Set up a tab.
- Review the tab settings, then click Save.
You can also add Calendar Pro from inside a channel: click + Add a tab at the top, then search for Calendar Pro.
- 2
Create your first event
- Open the Calendar Pro tab.
- Click a day, or the New button, to open the event form.
- Enter a title, set the start and end time, and add a description or location.
- Click Save. The event appears for everyone in the channel.
To repeat an event, assign tags, attach files, or set a location, see creating and managing events.
- 3
Invite your team and set permissions
- Open the Permissions settings.
- Choose who can edit: Everybody can edit (all plans), Only owners can edit (Premium), or Custom permissions (Platinum).
- Click Save.
For the full walkthrough, see managing permissions.
# Key features
# Choose your plan
Calendar Pro comes in three plans, so you only pay for what your team needs.
Free (Basic)
Everything a team needs to share a calendar.
- Month, Week, Day, and Agenda views
- Single events
- Event colors
- Up to 3 rooms
- Calendar cloning
- Teams notifications on add, update, and delete
Premium
Advanced events and personalization.
- Everything in Free
- Recurring events
- Tags and filtering
- File attachments and event locations
- Personalized views (business days and holidays)
- Owners-only permissions
- One-click copy of events to Outlook
- More than 3 rooms
- Support tickets and live chat
Platinum
Automation and full control.
- Everything in Premium
- Meeting Scheduler
- Custom permission roles
- Calendar-to-calendar synchronization
- Automatic Outlook sync
- API and Power Automate connector
# Privacy and consent
The first time you open Calendar Pro, a privacy consent dialog asks whether you want two optional extras. It opens on a short benefit-first view, and both options are off by default.
- Email me tips & offers: about once a month, product tips, updates, and offers by email. You can unsubscribe in one click at any time.
- Help improve Calendar Pro: usage insights that help Witivio fix bugs faster and prioritize the features teams actually use. This never includes the content you create in the app.
From the first view you can:
- Click Accept all to turn both options on.
- Click Customize to open the detailed view, switch each option on or off on its own, then click Save my choices.
- Click Cancel to close the dialog without sharing anything.
Your answer is saved for you alone, so it does not change anything for your teammates.
# What declining does and does not affect
Declining does not limit Calendar Pro. Every feature included in your plan keeps working, and answering the dialog is never a condition for using the app.
These choices also never touch your calendar data. Events, tags, attachments, and everything else you create in Calendar Pro stay with your team and are never used for marketing.
If you close the dialog without answering, Calendar Pro asks once more about five days later, then stops asking.
# Change your choice later
In the calendar toolbar, click More options (···), then Privacy choices. The dialog opens directly on the detailed view with your current settings, so you can turn an option on or withdraw it whenever you want.
# Common setup questions
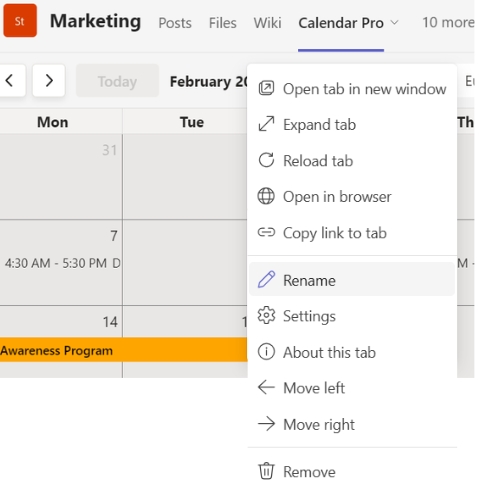
# How do I rename the Calendar Pro tab?
Click the drop-down arrow next to the calendar, select Rename, enter the new name, and click Save.
# How do I find my Calendar ID?
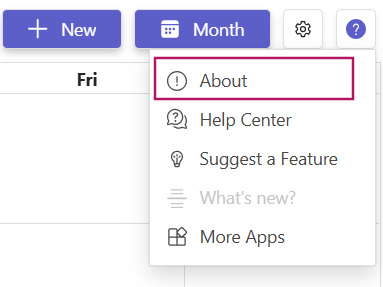
Click the Help ❔ button next to Settings ⚙️, then select ℹ️ About.
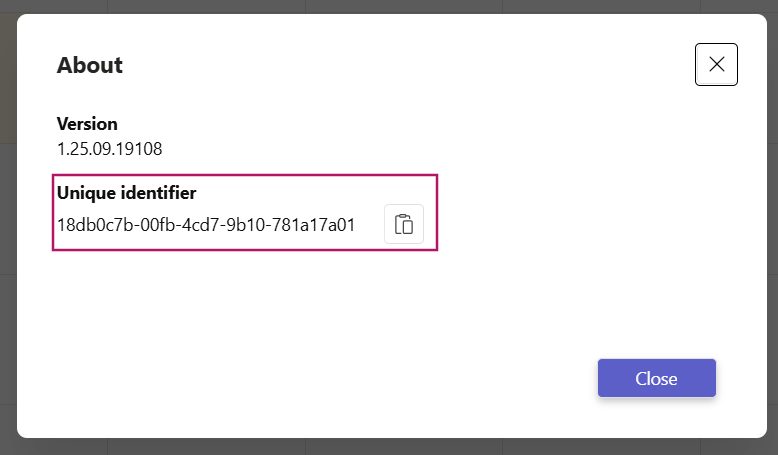
A dialog opens showing the Calendar Pro Unique Identifier.
# How do I check my Calendar Pro version?
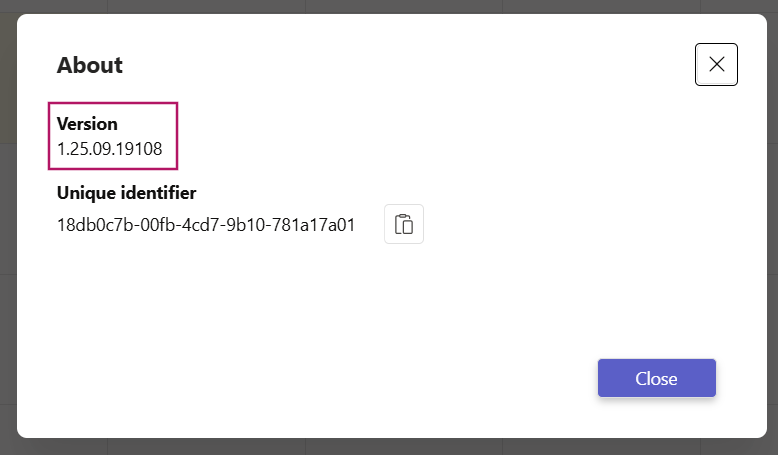
Click the Help ❔ button next to Settings ⚙️, then select ℹ️ About. The dialog also shows the Calendar Pro version.
# How do I connect Calendar Pro with Map Pro?
First, copy your Calendar ID from Help ❔ → ℹ️ About (see above). Then open the Map Pro tab, click the three dots [...] next to Trips, choose Connect, select Calendar Pro from the drop-down, paste the Unique Identifier, and click Save.
# Next steps
- Explore the Calendar Pro fundamentals to master views, events, and customization.
- Set up synchronization with Outlook, Gmail, or .ics.
- Book shared time with the Meeting Scheduler.
- Still have questions? Browse the Calendar Pro Q&A.
← Overview Manage View →