
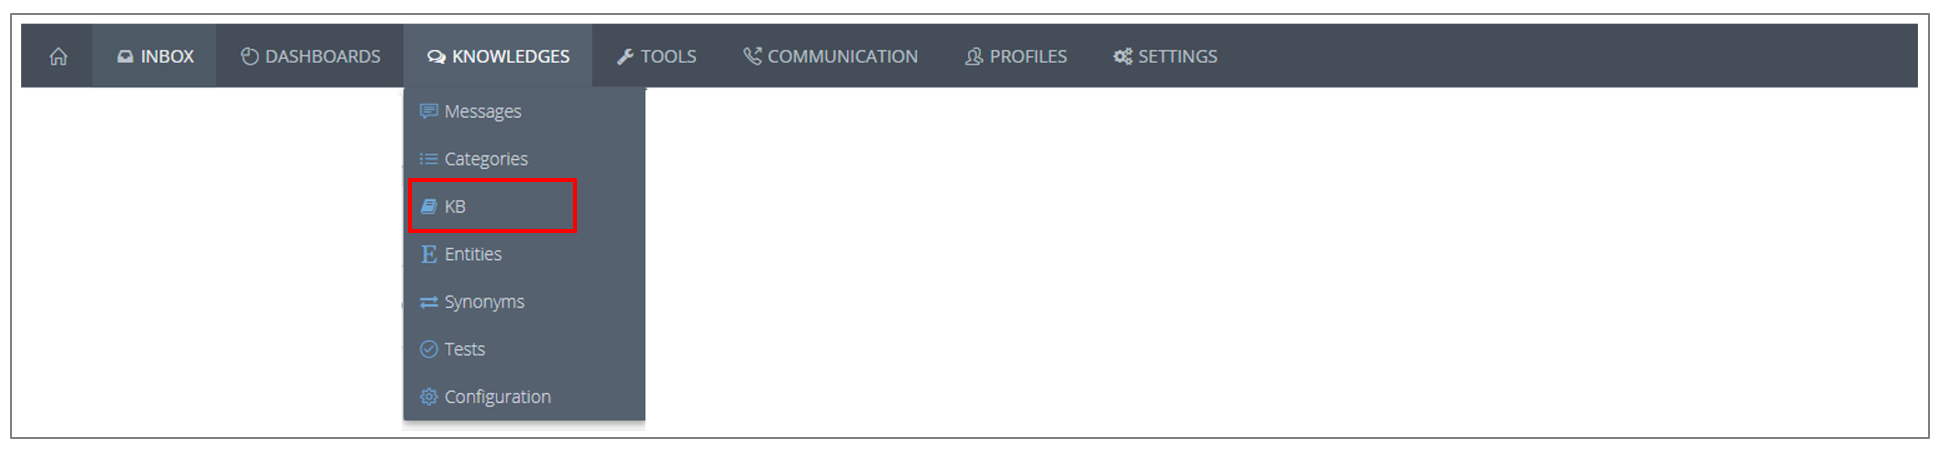
# KB : Knowledge Base
Click on Knowledge then KB.
# What for ?
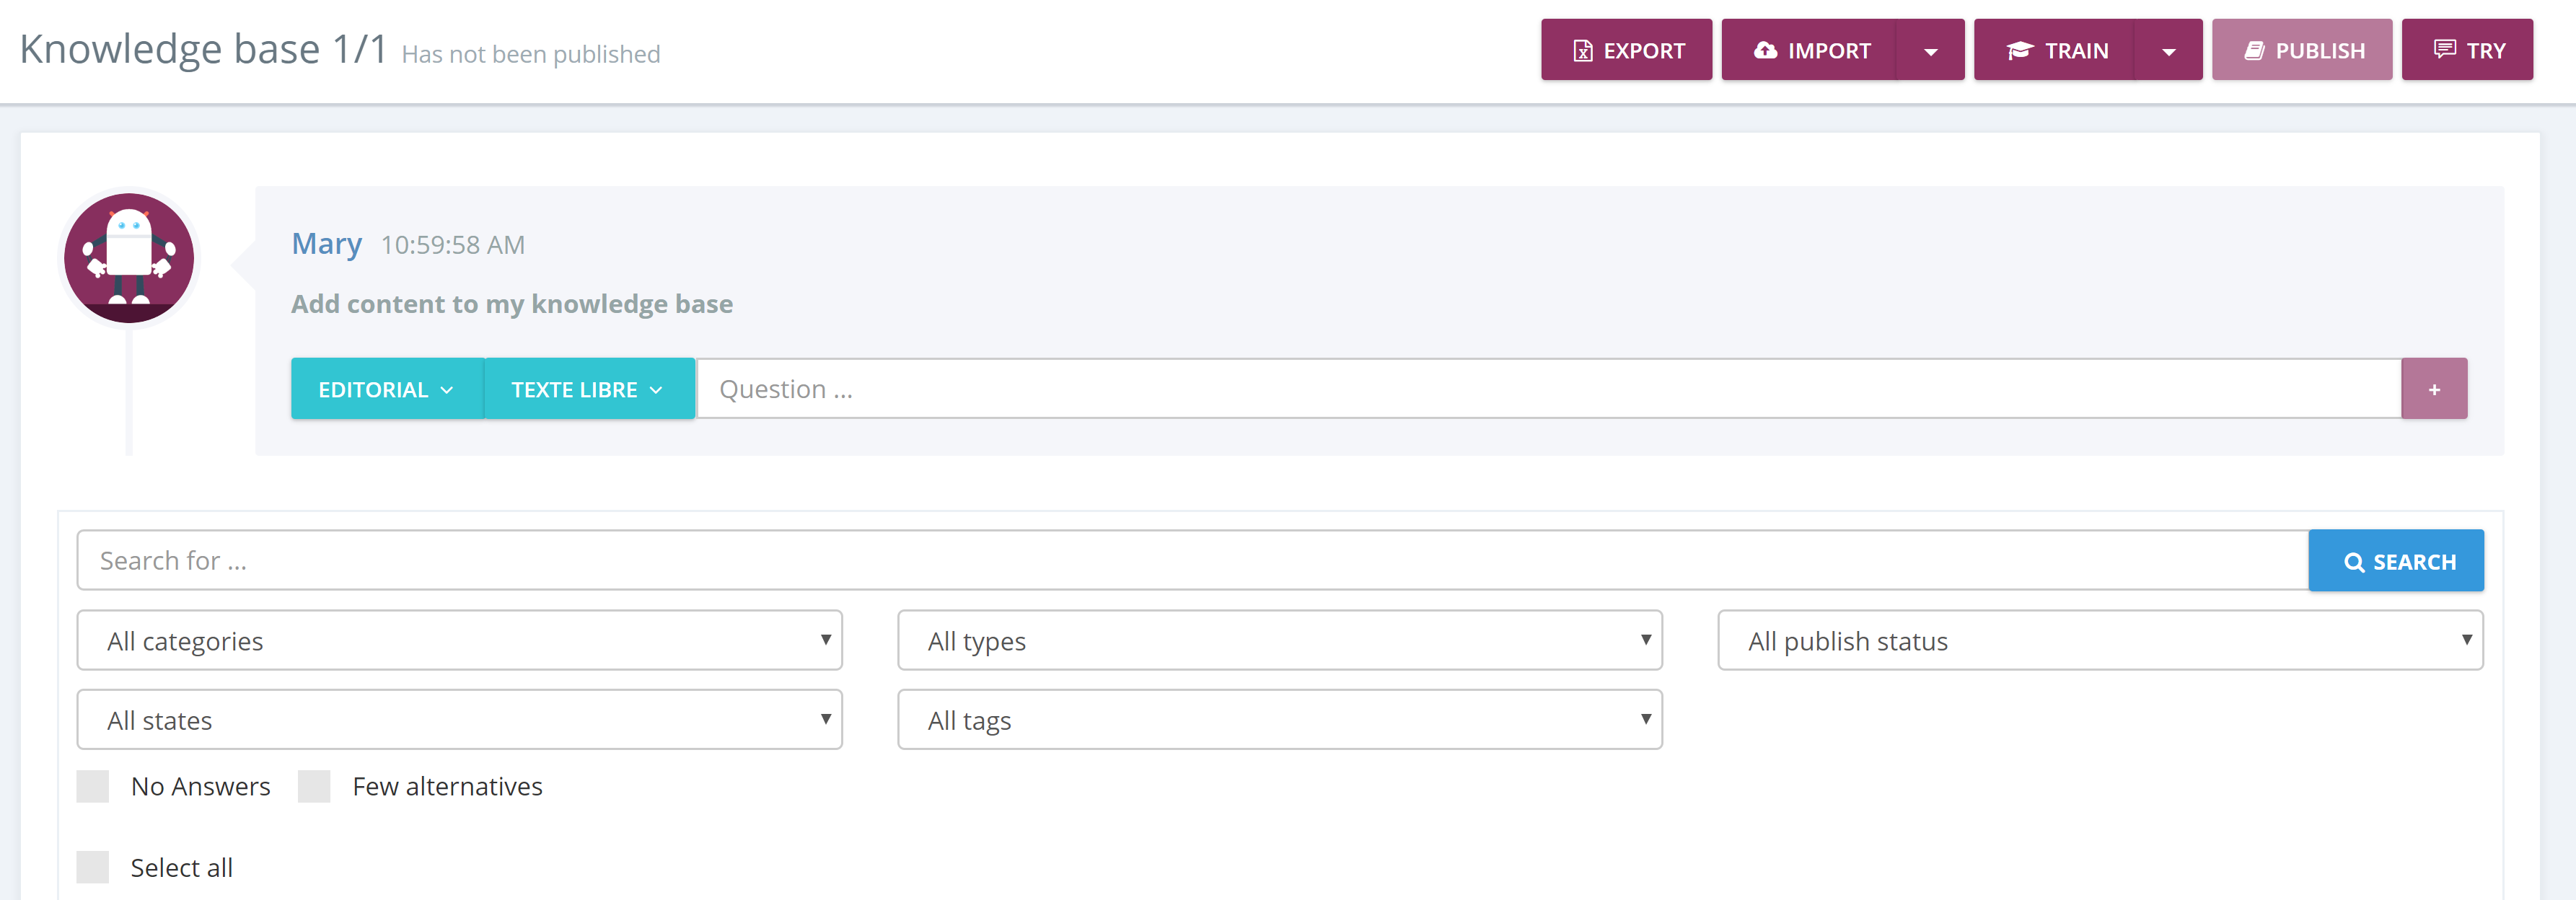
In the “KB” tab you can configure all the questions you want the chatbot to answer as well as the expected answers.
Building a knowledge base means answering the following questions:
What should my chatbot answer?
Who are the users of my chatbot?
Before starting to build your knowledge base, please read the technical limitations .
# How ?
# Import

If you already have a knowledge base, for example several questions and answers from a FAQ, you can import this data into the platform. The file must be in Excel format and follow this specific form:
- Column 1: Questions
- Columns 2: The answers
- Alternatives: below the “principal” question. The altenative will be different than the e the same.
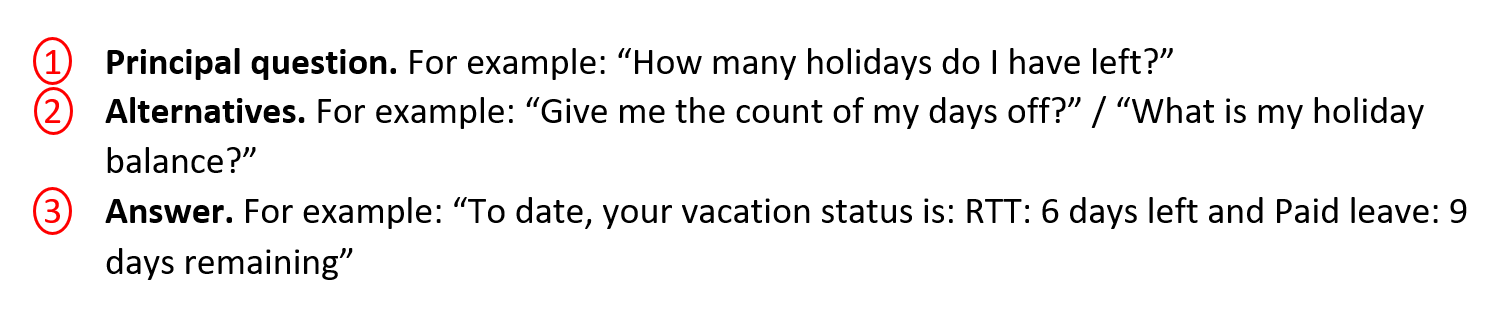
📖 What is a “principal” question?
It is the question that is displayed prominently in your knowledge base. Each principal question can have several alternatives. The chatbot will not make the difference between a principal question and its alternative when it comes to understanding the question of the user.

⚠️
In column 2 (answer)
Copy/Paste the answer to have exactly the same for the question and the alternatives. If it’s written differently, the alternative will not be linked to its principal question.
⚠️
Title and header
The Excel file to be imported must not have a column title and header.
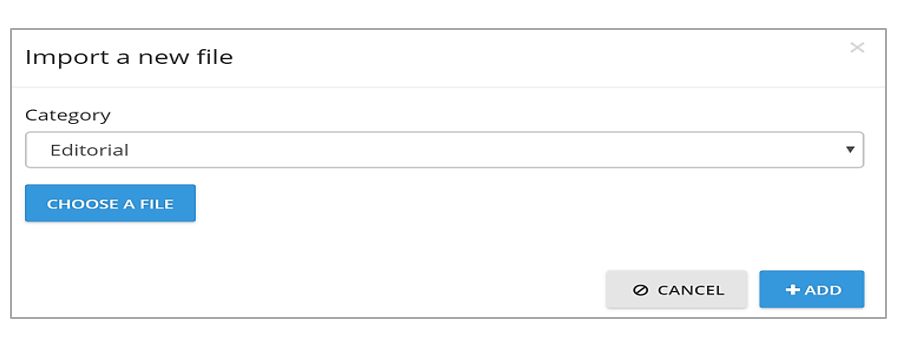
To import the file, click on “IMPORT”.

If there are several categories, select the category in which you want to import your file. The "Editorial" category includes all the questions.
# Export

The "EXPORT" tab allows you to download the knowledge base. It is possible to download by categories by adding a filter before exporting.
Search in the knowledge base
It is possible to find a question more easily and quickly by typing one or more words in the search bar.
You also have filters to help you find a question in your knowledge base. You can therefore filter by:
- Categories
- Type of answers: simple answer, adaptive card, contextual answer,conversation tree, Webhooks, Microsoft Flow, Azure Logic Apps.
- Publication status: Recently added or modified an not trained, Trained and not published, Published in integration, Published in production.
- No answers
- Few alternatives
- Select All
# Advanced Import
Once your knowledge base is exported, make the required modifications, save your excel export and then import it using the ADVANCED IMPORT button.

# Filter your knowledge base
Search bar: you can find a question more easily and quickly by typing one or more words in the search bar.
You can also use other filters to find a question more easily in your knowledge base. You can filter by :
- Categories
- Type of answers: simple, contextual, conversation tree, Adaptive Card, Webhooks, Power Automate, Azure Logic Apps.
- Publication status: Recently added or modified, Trained and not published, Published in integration, Published in production.
- All states: ready to be published, to be validated
- All tags: it is possible to apply a multi-tag filter to display questions with multiple tags at the same time.
- No answers
- Few alternatives
- Select all
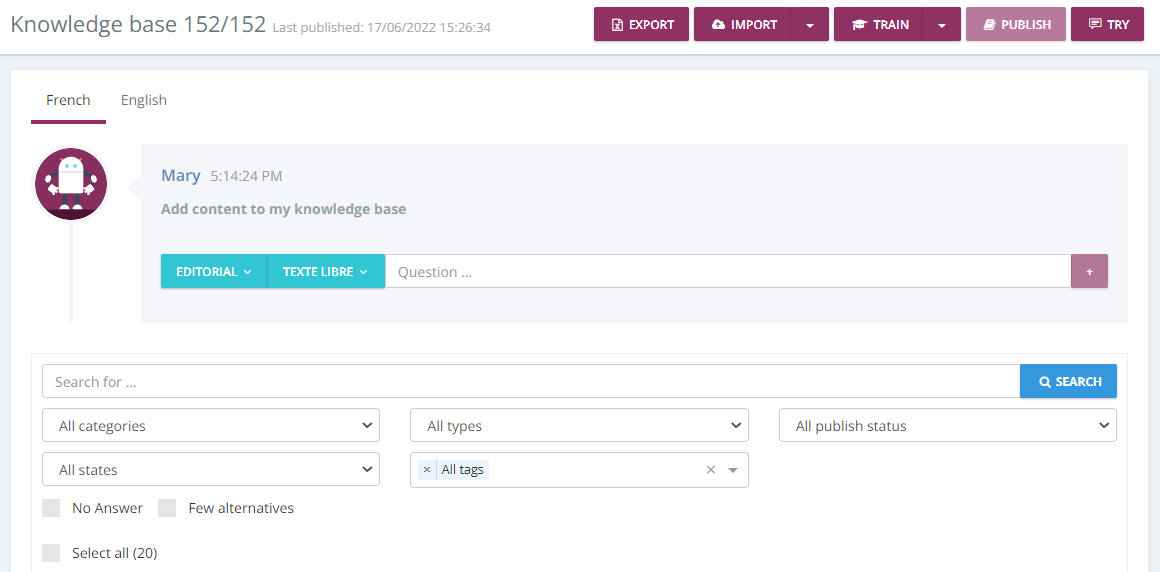
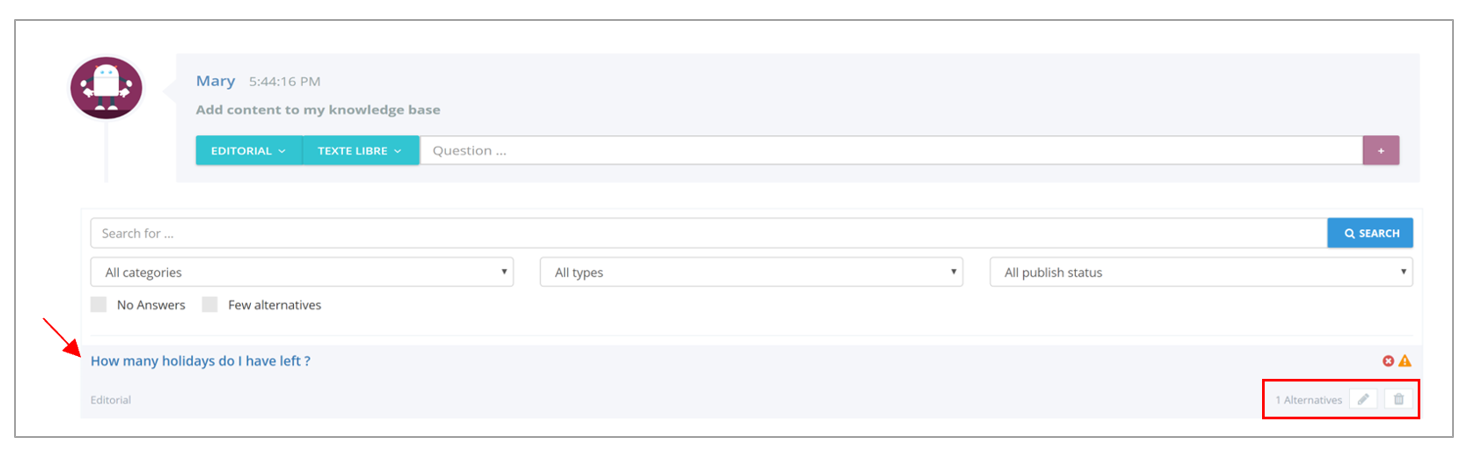
# Create a new question
Once you have created your question, click on it to modify it, add the answer and/or alternatives.
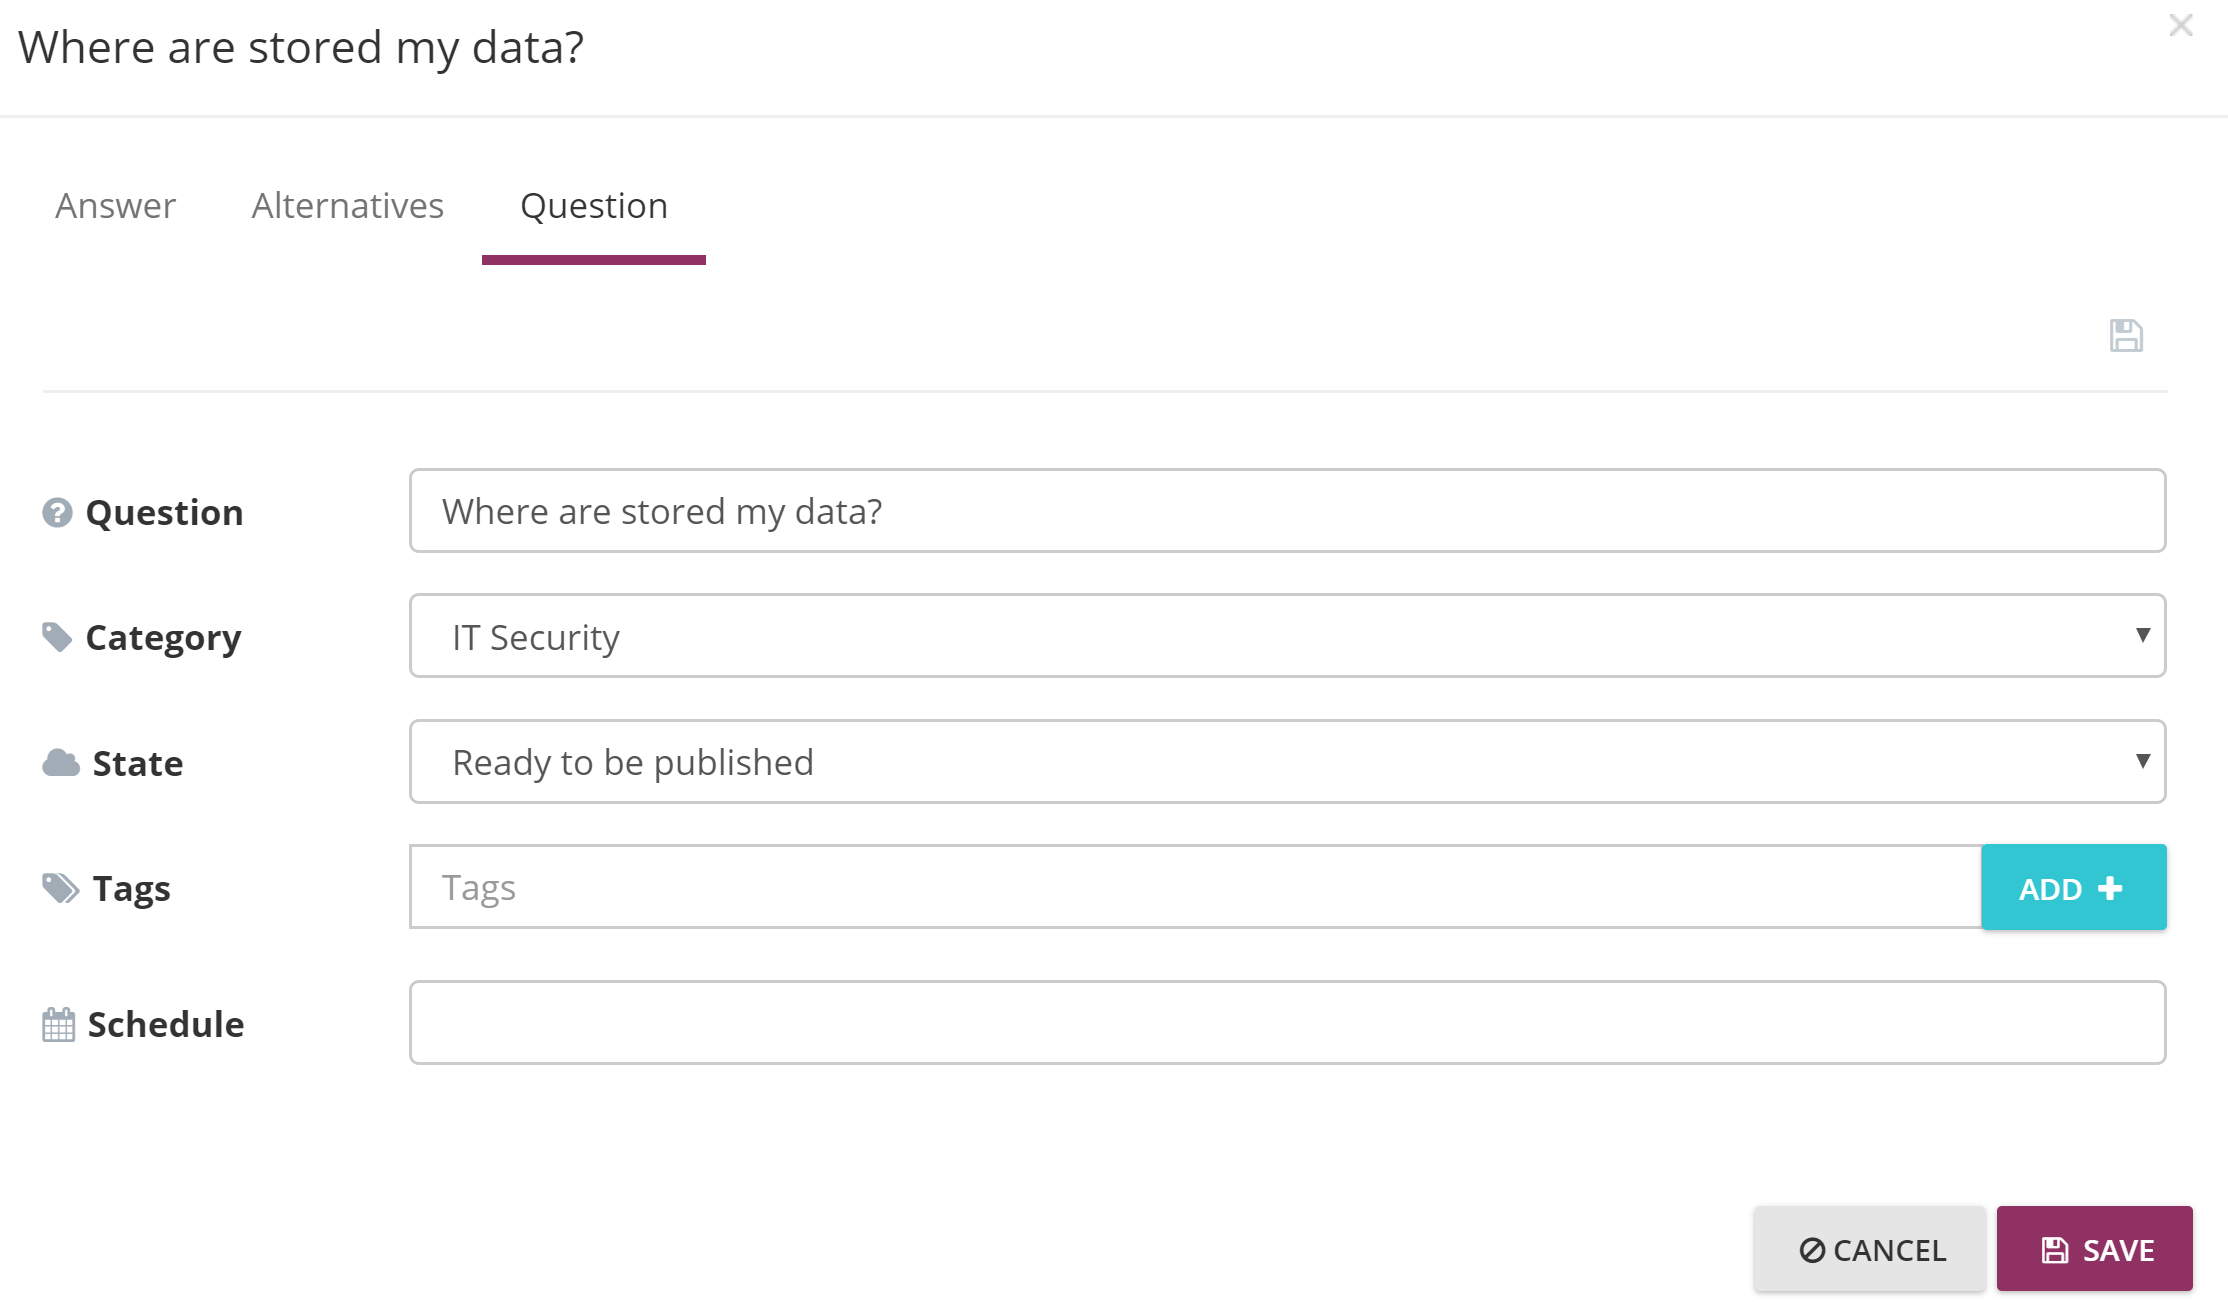
- It is now possible to modify the advanced parameters (category, profile, schedule ...) of a question before entering the answer.
- Status: Fill in the status of your question and add a tag to facilitate the construction of your chatbot's knowledge base (Ready to be published or validated).
- Tags: Improve, complete the answer,... It's up to you to determine the use of this feature!
You can also add tags to your chatbots from the Settings tab > Settings > Bot.
The knowledge base corresponds to all questions that the chatbot will be able to answer. The creation process includes all the steps to create, modify, test and finally publish the questions and answers.
In order to enrich the chatbot's knowledge base, it is necessary to add:
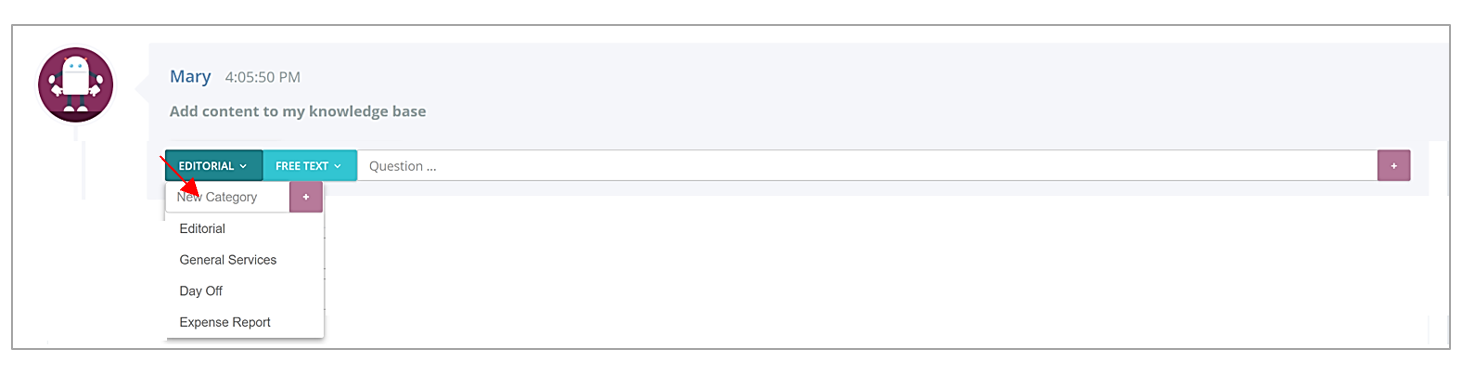
# New question
- First, choose the category in which you want to add your question. Choose an existing category or add a new one.
- Select “FREE TEXT” if you want to write the question. Otherwise, choose one of the templates, for instance “What’s .. for”, “How many”, … to create your question.
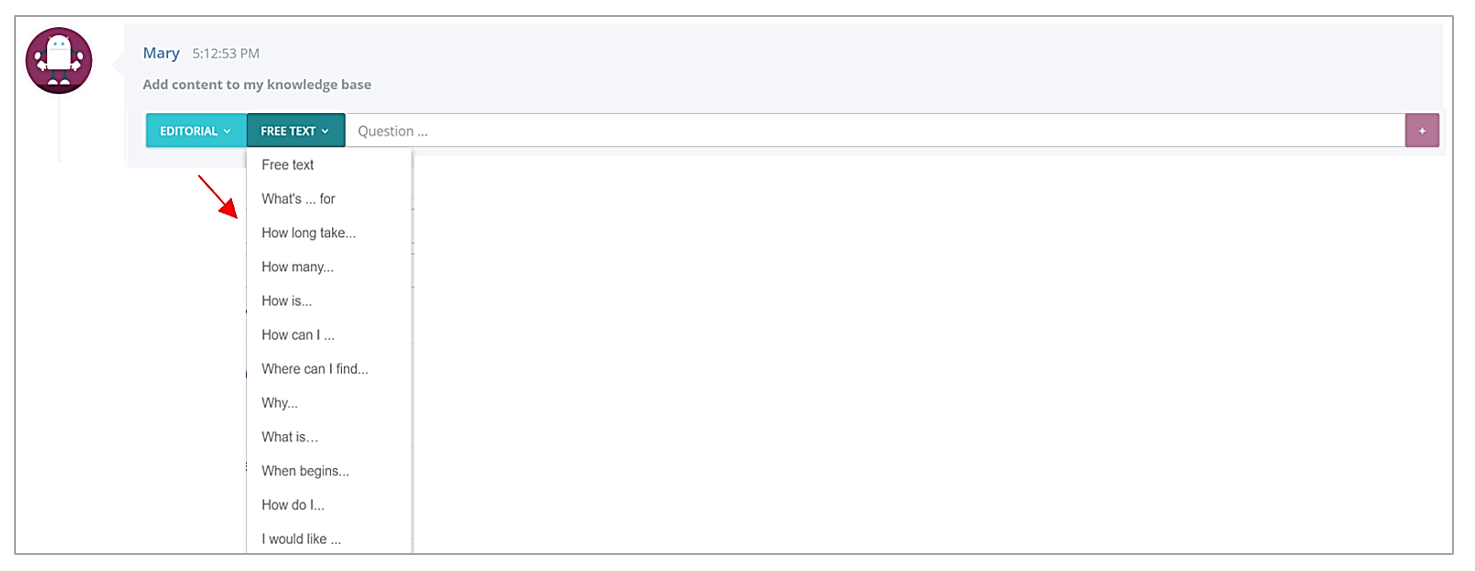
🔴
When you use a template, the platform will generate alternatives automatically.
Once created, the question is displayed and it will then be possible to modify it , delete it, add the answer and also new alternatives.
# Symbols
Different symbols are displayed next to the new question:
| Symbol | Signification |
|---|---|
| ❌ | No answers. The question has no answer, therefore the chatbot will not be able to provide an answer to the user for this question. |
| ⚠️ | Few alternatives. Add alternatives to facilitate the chatbot’s comprehension. |
| ☁️ | cloud that allows to know the publication status as well as the environment. |
blue cloud : the question is published in integration
grey cloud: the question has not yet been published
green cloud: the question is published in production
| Symbol | Signification |
|---|---|
| 👁️ | State of the question |
to validate: The status to be validated means that the response is to be reviewed or completed and therefore it is not yet ready to be published. You can still train a question with the status "to validate" in order to test in integration.
ready to be published: Once the answer is validated, the status of the question can be changed to "ready to publish". The question can then be published.
How to create a question
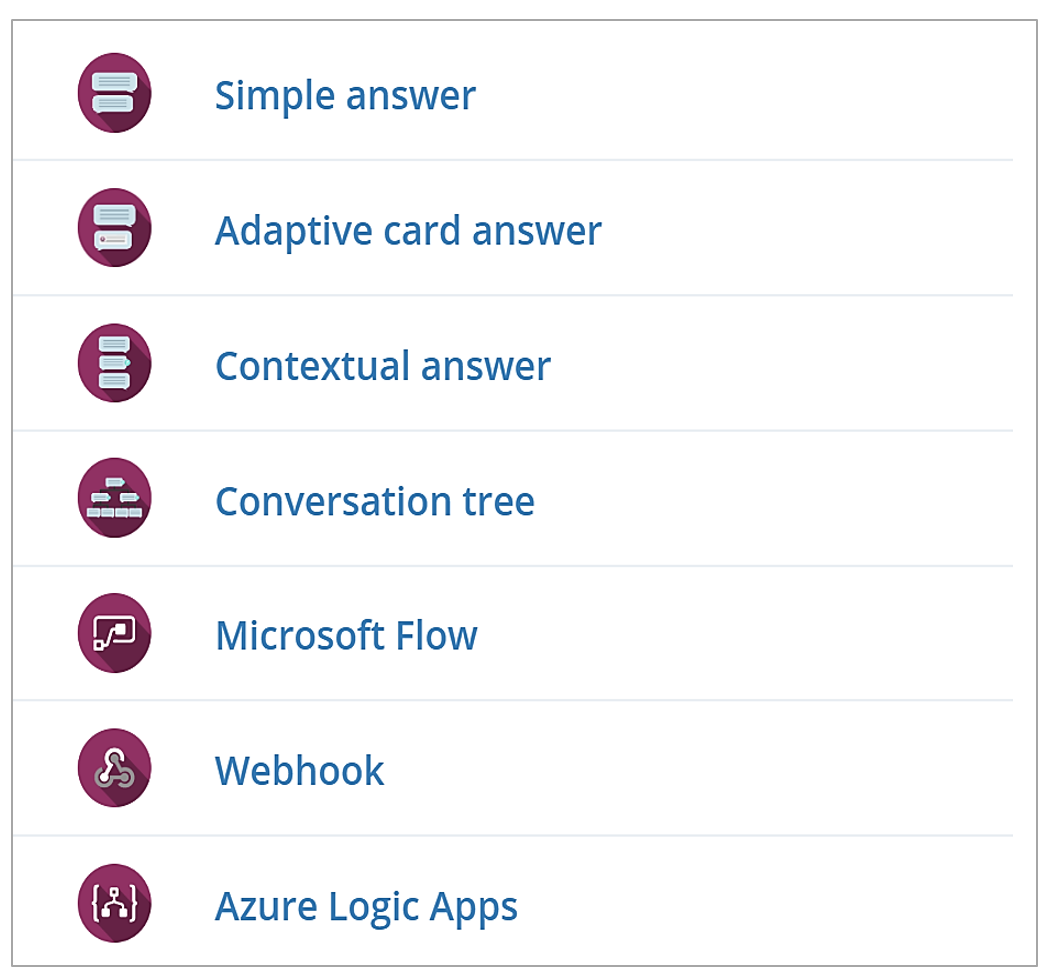
# Types of answer
Once the question is created, choose the appropriate answer:
- Simple answer: Write a simple and direct answer. Format it with the rich text editor.
- Adaptive card answer: Configure an Adaptive Card answer with a visual designer for advanced layout (available only for Webchat and Microsoft Teams channels).
- Contextual answer: Retrieve a context element from the user in order to provide the appropriate answer.
- Conversation tree: Create a conversational tree to answer advanced requests or orders.
- Microsoft Flow (Coming soon): Connect to other applications with Microsoft Flow middleware to build your answer.
- Webhook (Coming soon): Connect directly to an API to build your answer.
- Azure Logic Apps (Coming soon): Connect to other applications with Azure Logic Apps middleware to build your answer.
On the Knowledge Base tab click on the question and select the type of answer.
# Simple answer
It is a simple and direct answer.
Click on the question and select “simple answer”.
In the answer window you can find several features:
- (1) The category to which the question belongs. You can then change the category.
- (2) Schedule: you can plan the answer to your question. This means that the question will be available only for the chosen period. After, the chatbot will then not provide an answer.
- Change the type of answer: You can change the answer model (switch to an adaptive card answer) (3) or change the answer type (contextual answer, conversation tree, …) (4).
- A text editor allows the message formatting. You also have the possibility to add a hypertext link (5).
See more about markdown
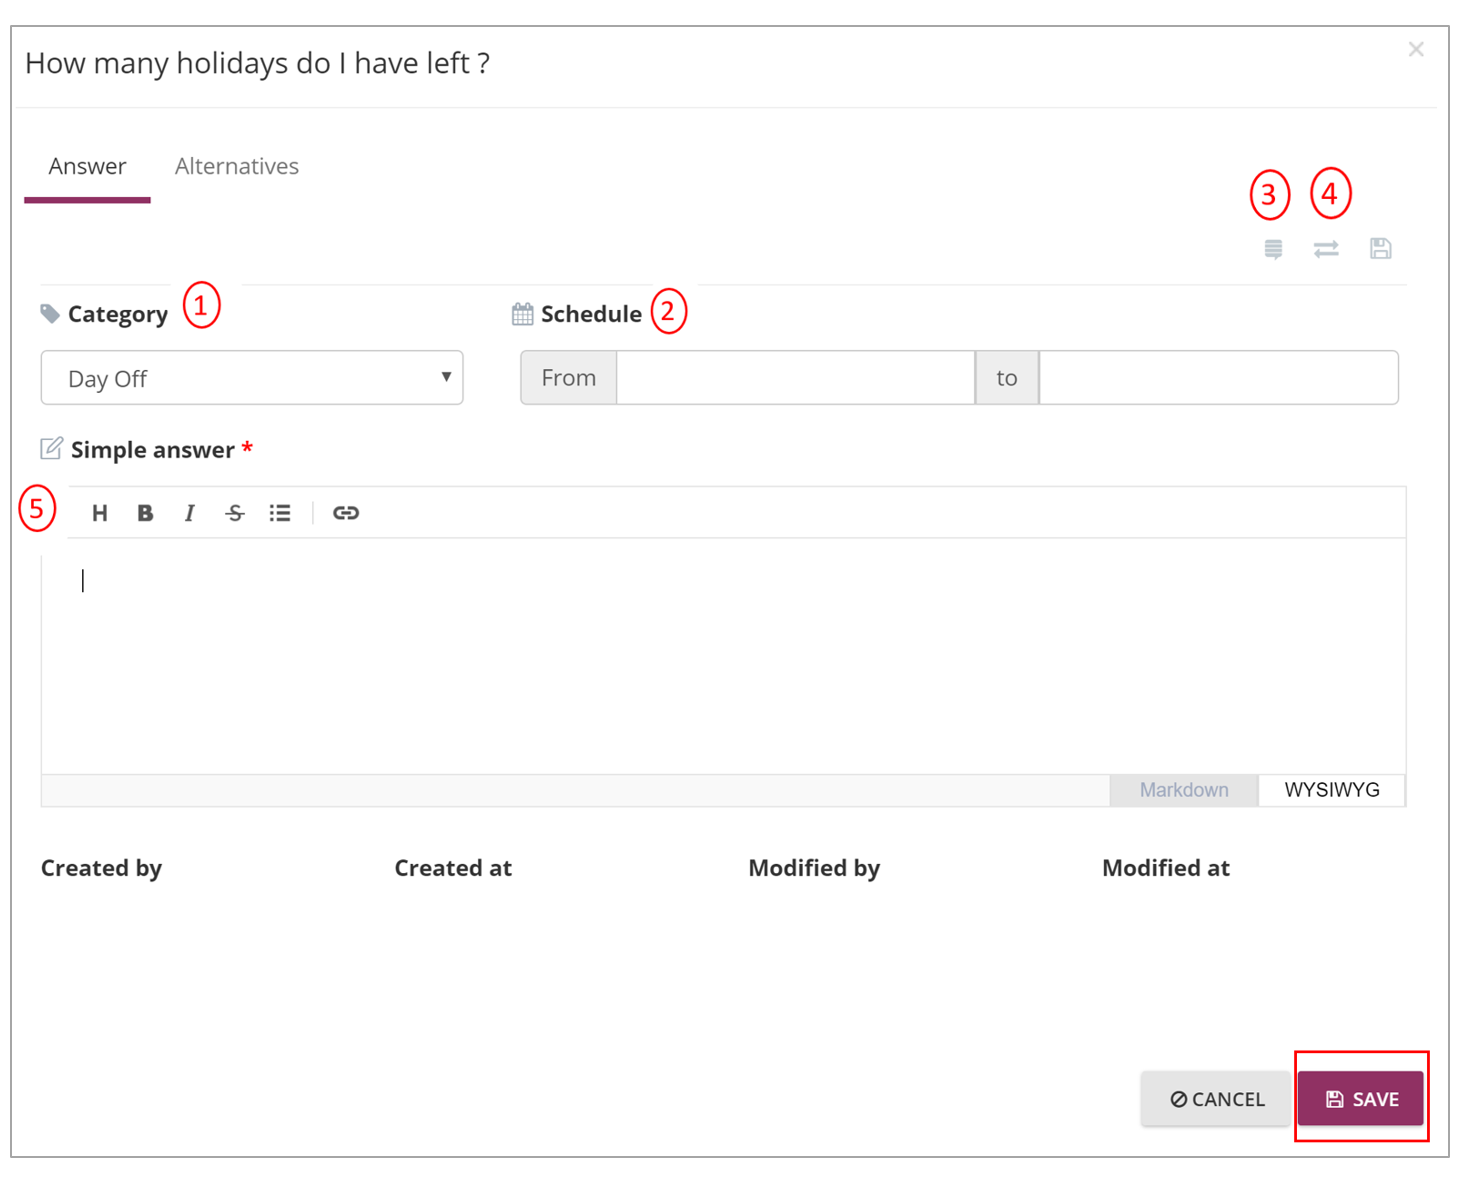
💾
Do not forget to save changes !
# Adaptive card
You can configure an Adaptive Card answer with a visual designer for advanced layout (image, media, action set, … ). This answer type is supported in Webchat and Microsoft Teams channels. You will not have access to Adaptive Cards on the Skype channel, however if you have several channels you can design a simple Adaptive Card answer for the Teams and Webchat channels and write a simple text answer for the Skype and SMS channels.
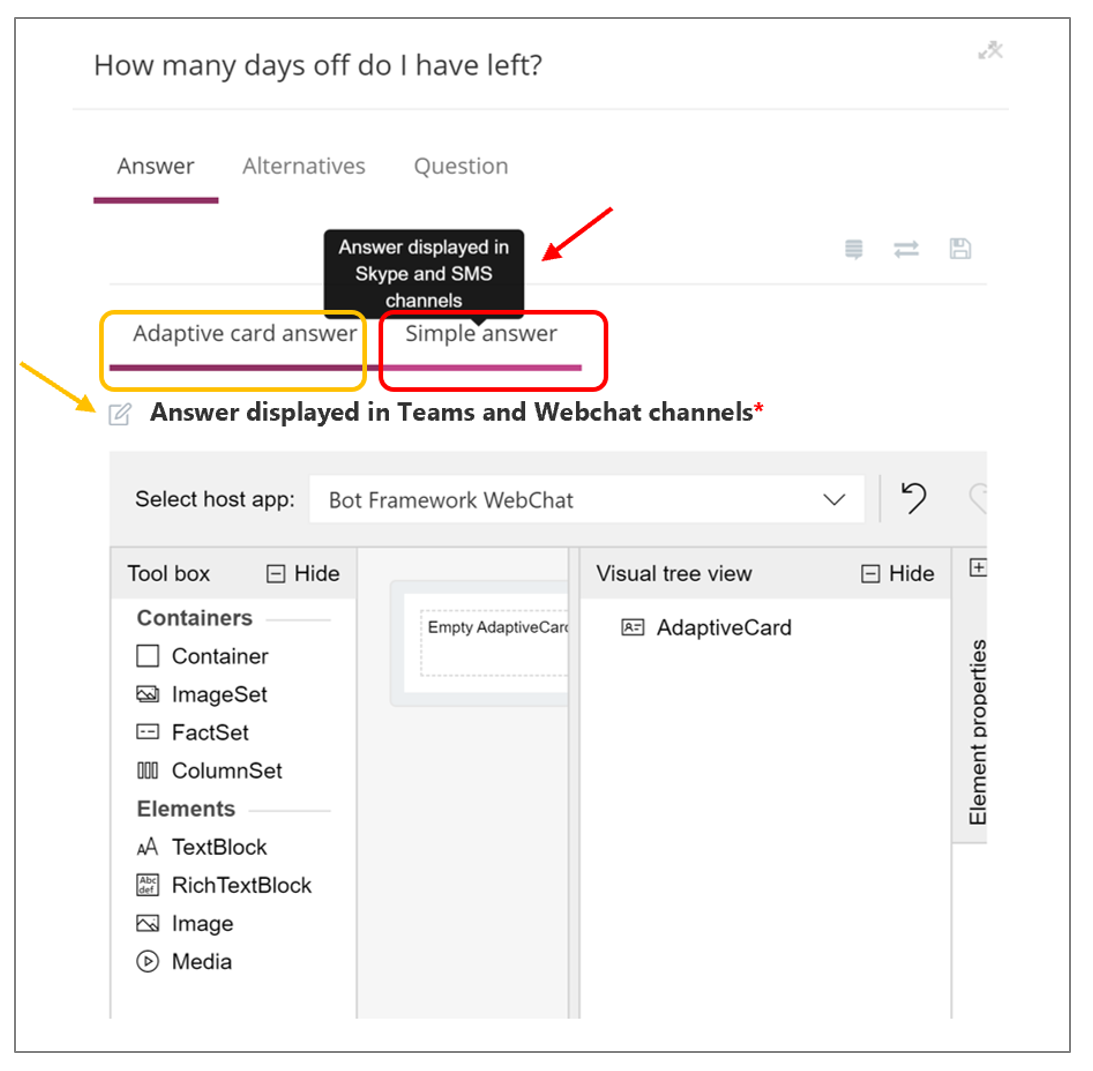
Several elements in the toolbox allow you to create an Adaptive Card. To do this, drag the elements from "Containers" and/or "Elements" into the Adaptive Card.
Then click on the + at the top right (1) to display the properties of the dragged elements, in order to modify them as wished.
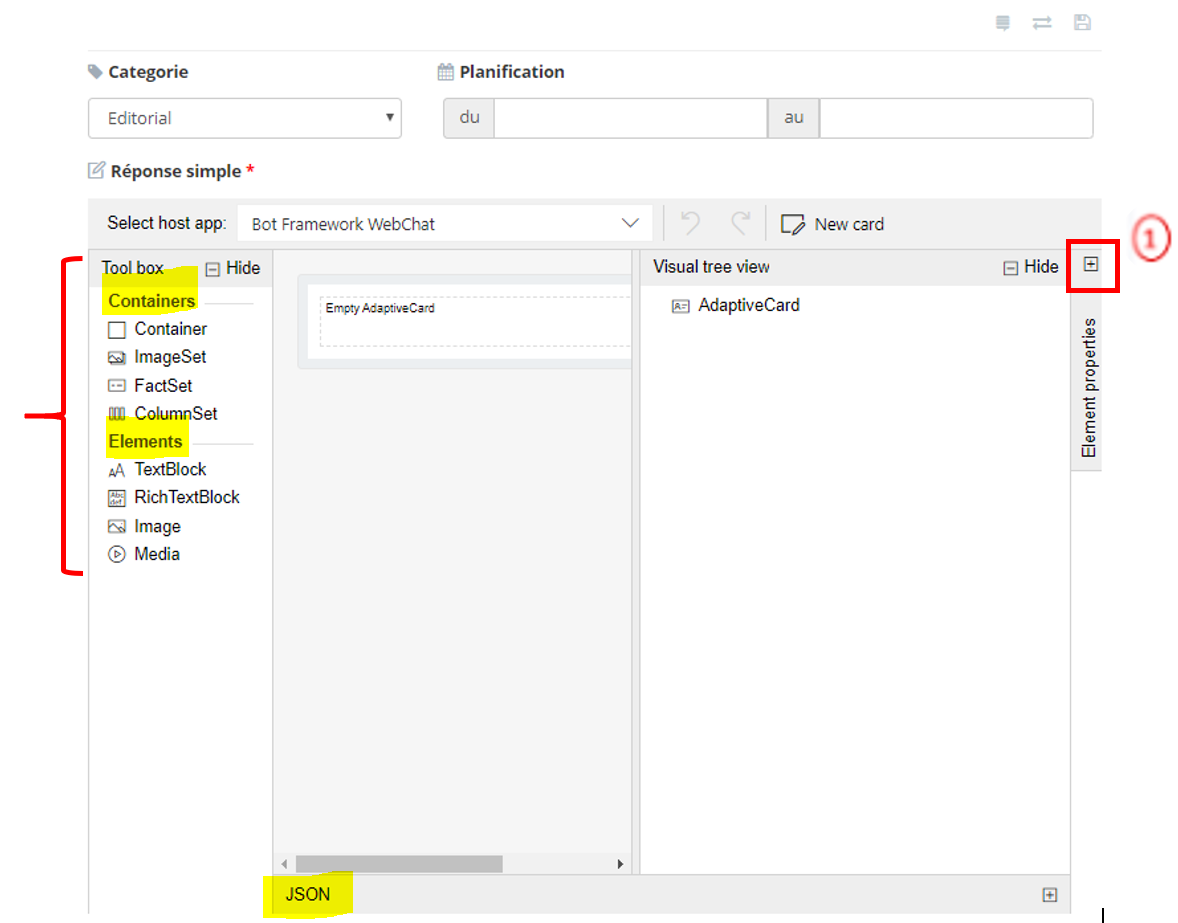
# CONTAINERS
- Container: it is possible to put elements of "Elements" in the container ( TextBlock, Rich TextBlock, Image and Media)
- ImageSet: Add multiple images. Once this element has been dragged into your Adaptive Card, click on the + at the top right (1) then on the "Add an image" button to add as many images as you wish.
- FactSet: Add elements here to categorize. For example, for example
- Fact 1 = Name / Value 1 = Smith
- Fact 2 = First name / Value 2 = Bryan
- Click on "Add a new fact" if you want to add an additional element
- ColumnSet: It is possible to put several columns and thus add one element among "Elements" per column (text, image, media...)
# ELEMENTS
TextBlock: use this element to add text to your Adaptive Cards
- Rich TextBlock: use the JSON editor to edit text
- Image: ⚠️ add the URL of the image you want to add
- Media: It is possible to add a video but it will only be available on the Webchat (the media element is not available for the Teams channel)
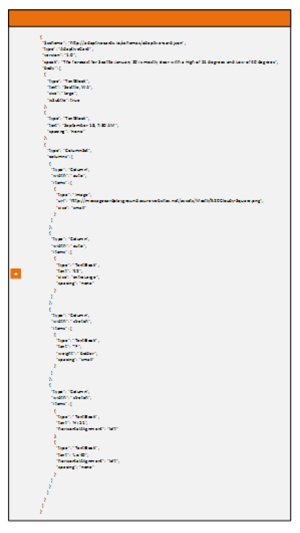
It is also possible to create an Adaptive Card using a JSON code. To do this, click on "JSON" at the bottom left of the page.
Feel free to visit https://adaptivecards.io/samples/ (opens new window)
How to create an adaptive card answer
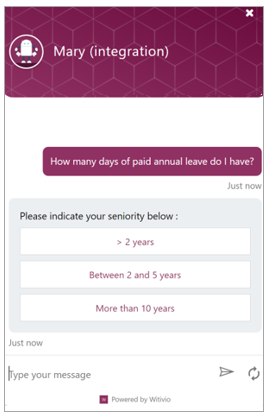
# Contextual answer
The chatbot retrieves a context element from the user in order to provide with the appropriate answer. As a consequence, before giving the answer, the chatbot ask a question to the user.
One you create the new question (1), click on it and choose “contextual answer”.
In the first box, add the question that the chatbot asks to the user (2). For example:
For example, for the question “How many days of paid annual leave do I have?”, before giving the answer, the chatbot need to know the seniority of the user. The chatbot will then give the appropriate answer.
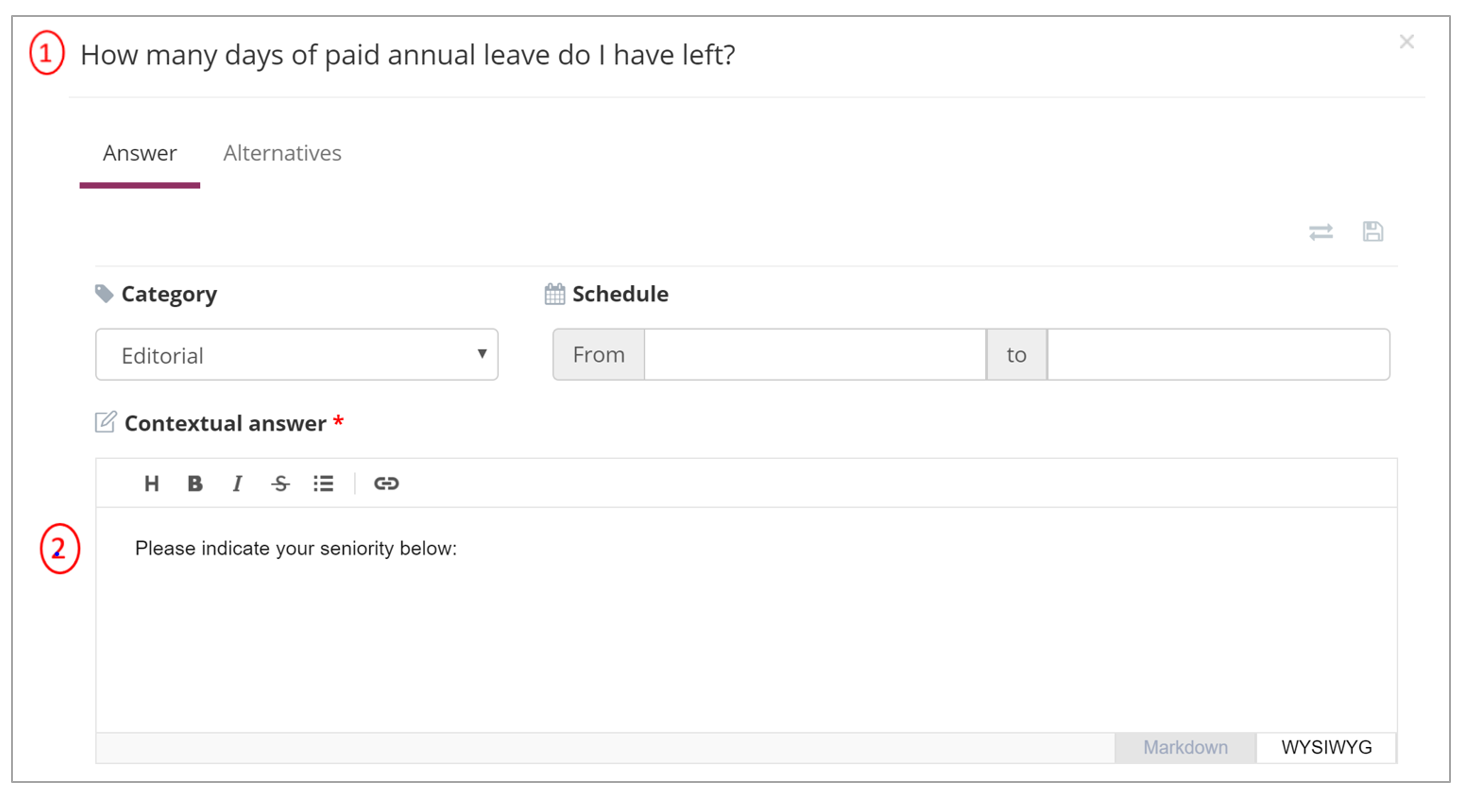
Enter then your choices and their answers (3)
Feel free to add new choices (4).
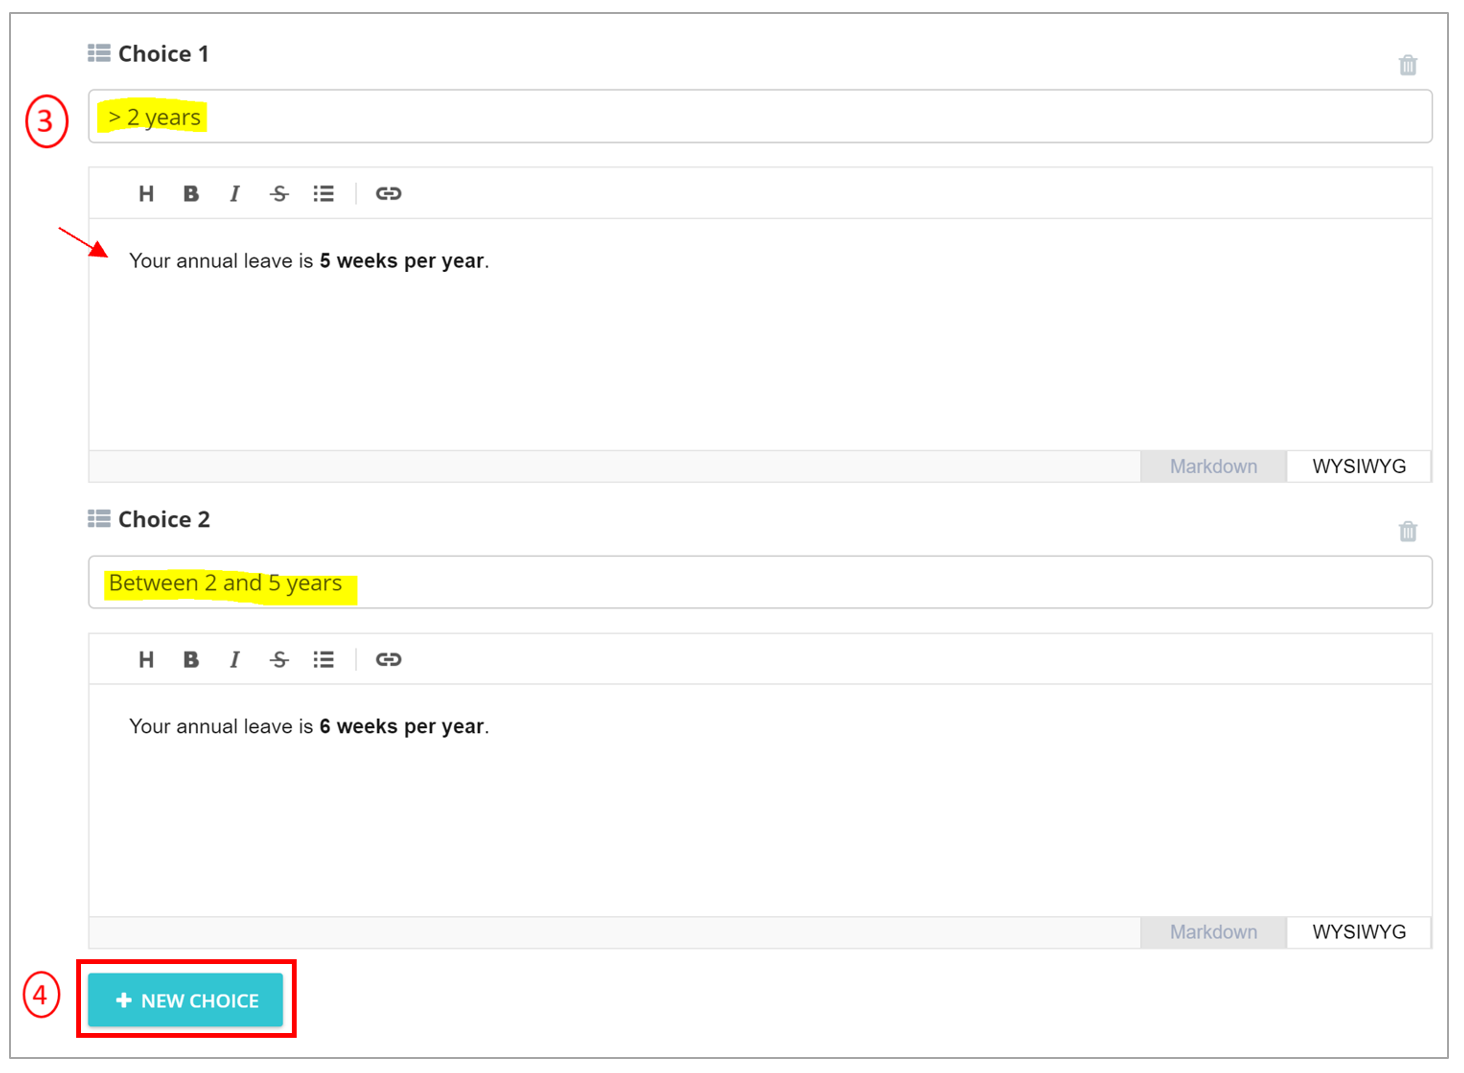
💾
Remember to save changes!
Example:
How to create a contextual answer
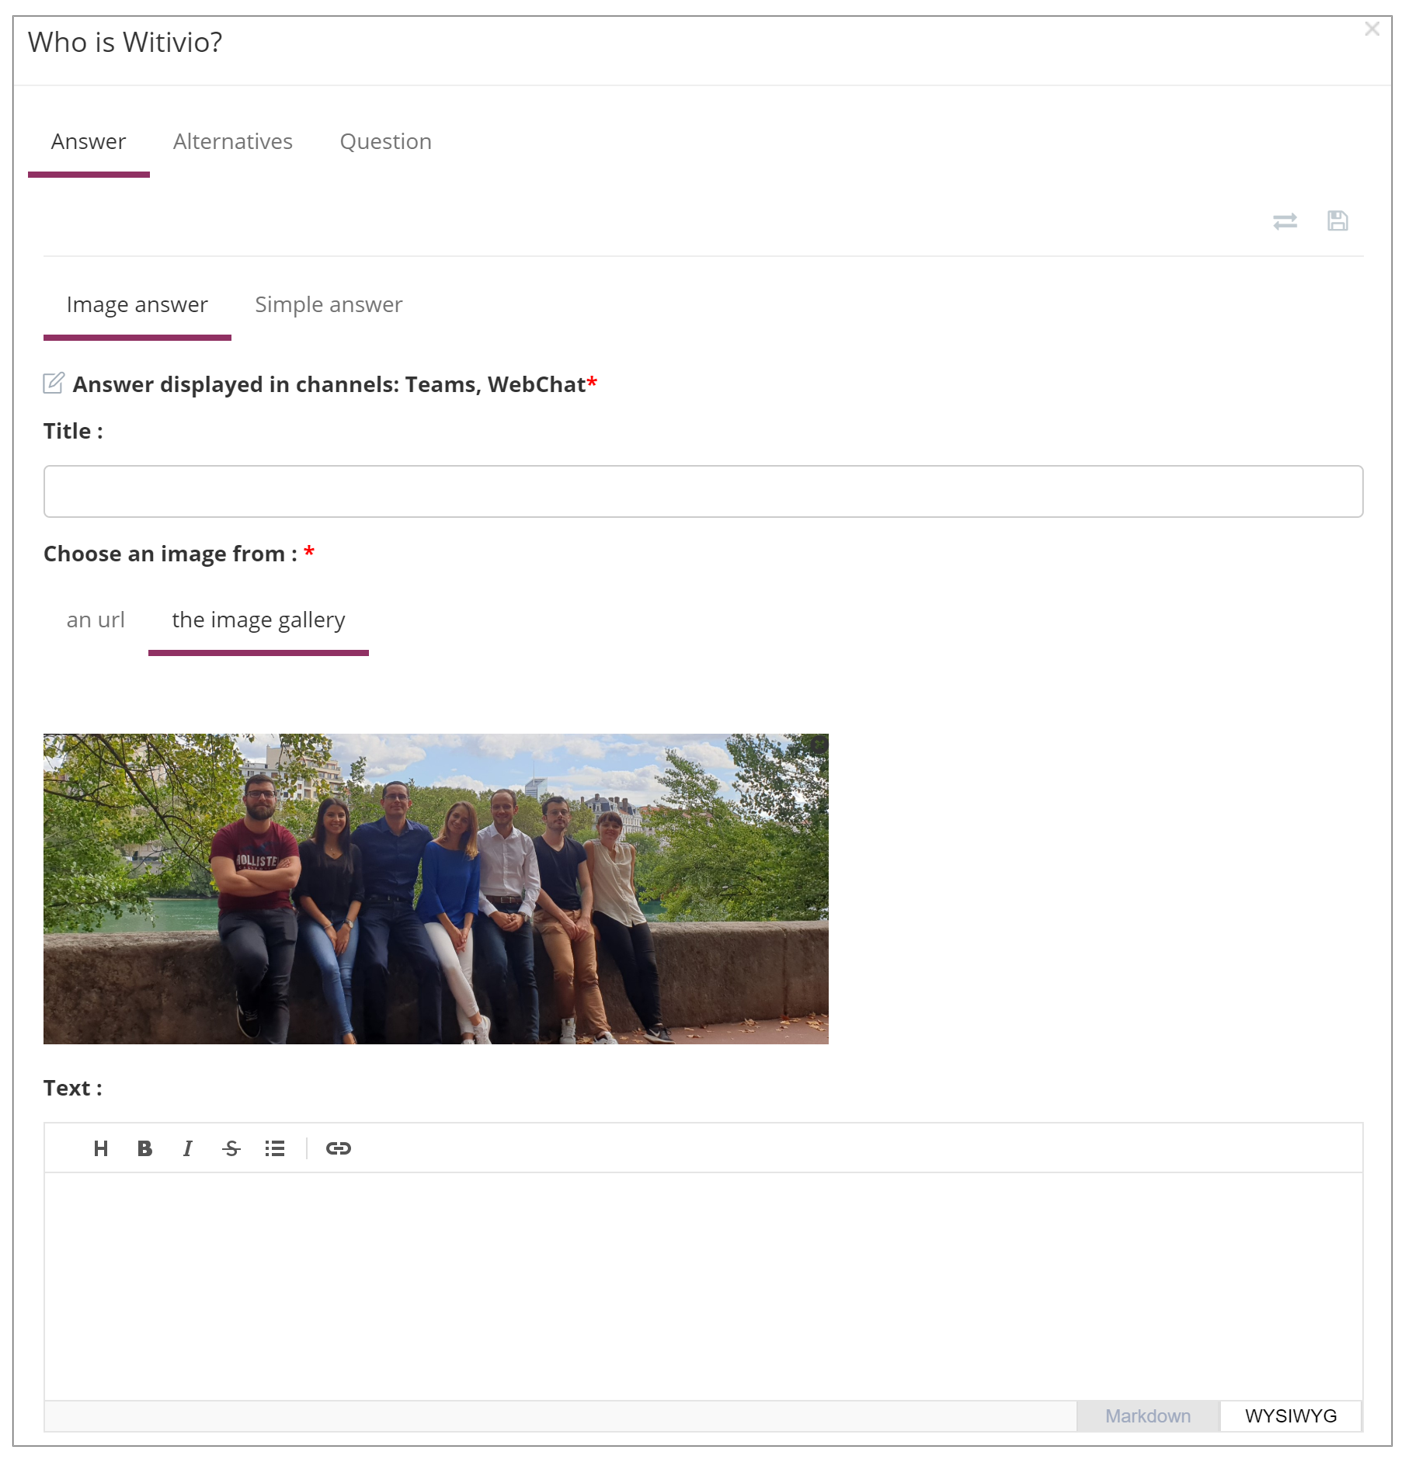
# Image answer
The image answer allows you to design a simple adaptive card composed of a mandatory image and an optional title and text.
When creating an image answer, add a title and text if you wish and then choose an image. It can be added from a url or from the image gallery.
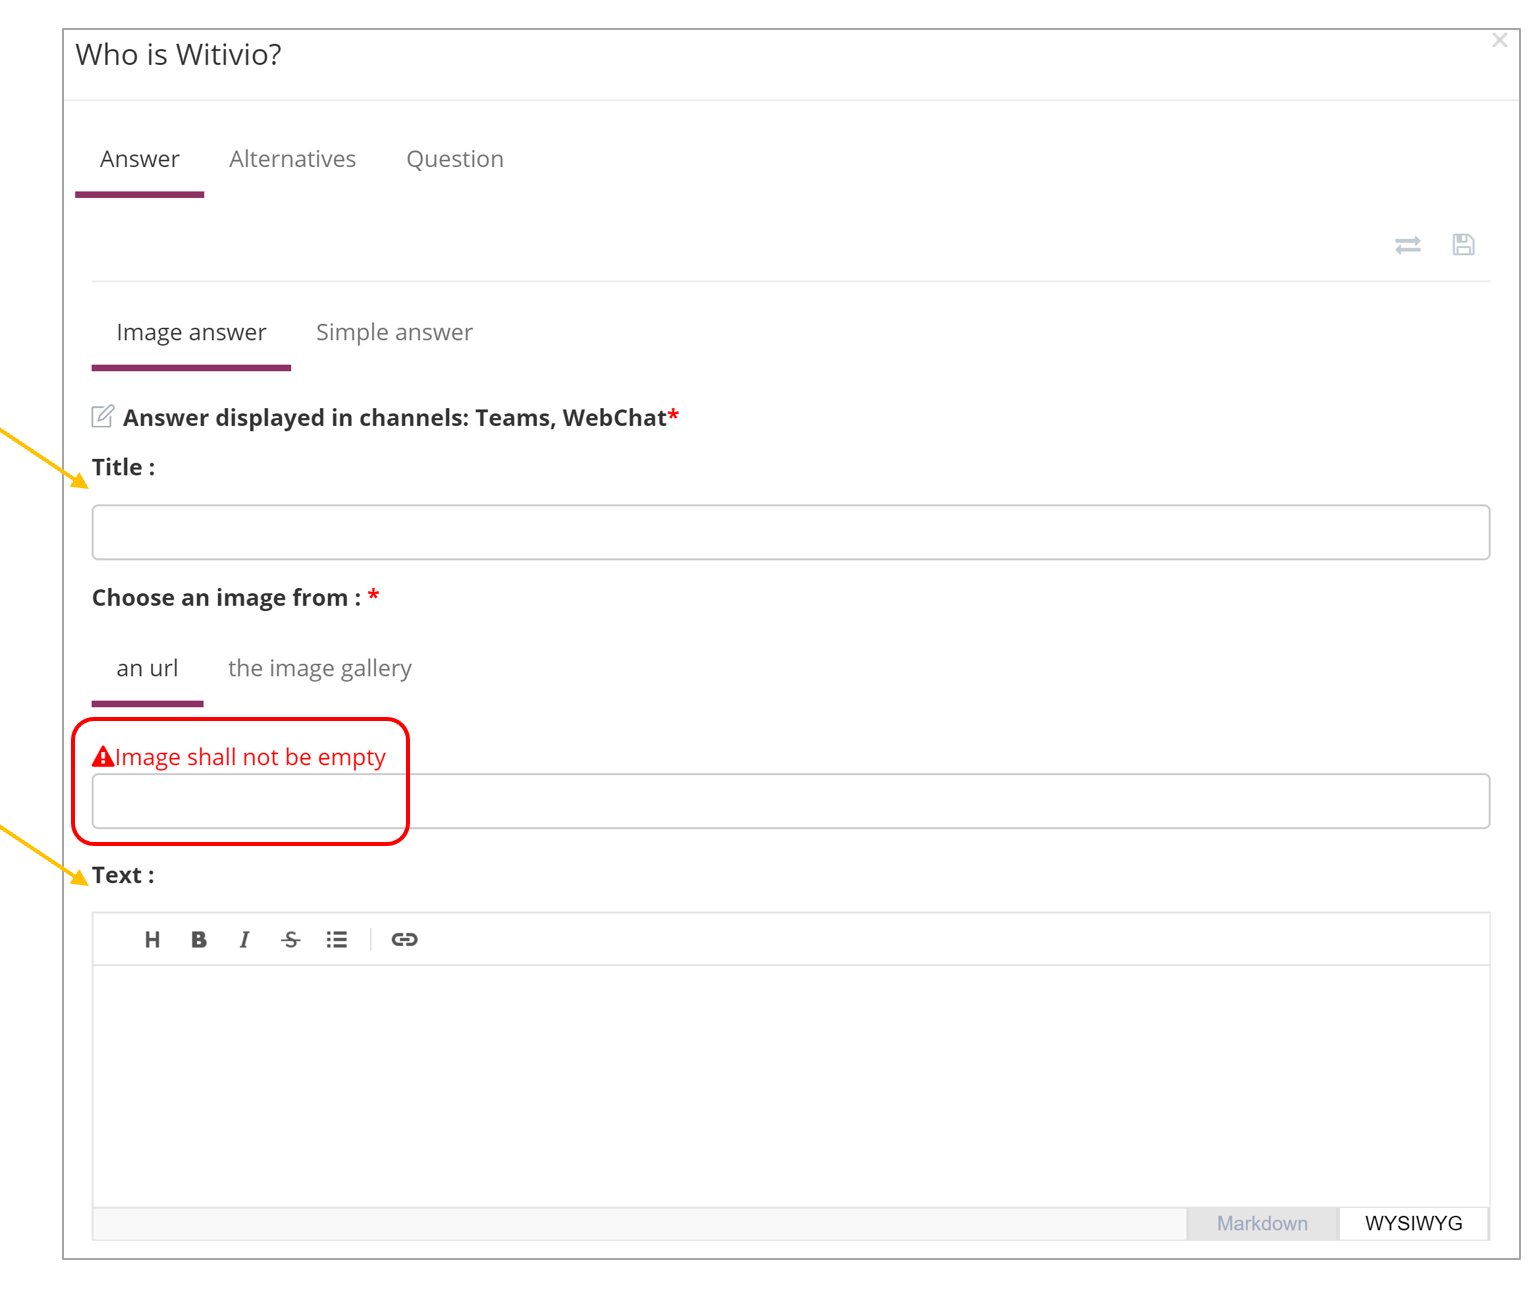
To add an image from a url, copy and paste it into the provided field.
To add an image from the image gallery, go to the tab then you can either choose an already existing image or add one directly using the Add button, upload an image button or by a drag and drop.
⚠️
The maximum image size is 2 MB and supported formats are .png, .jpeg and .gif.
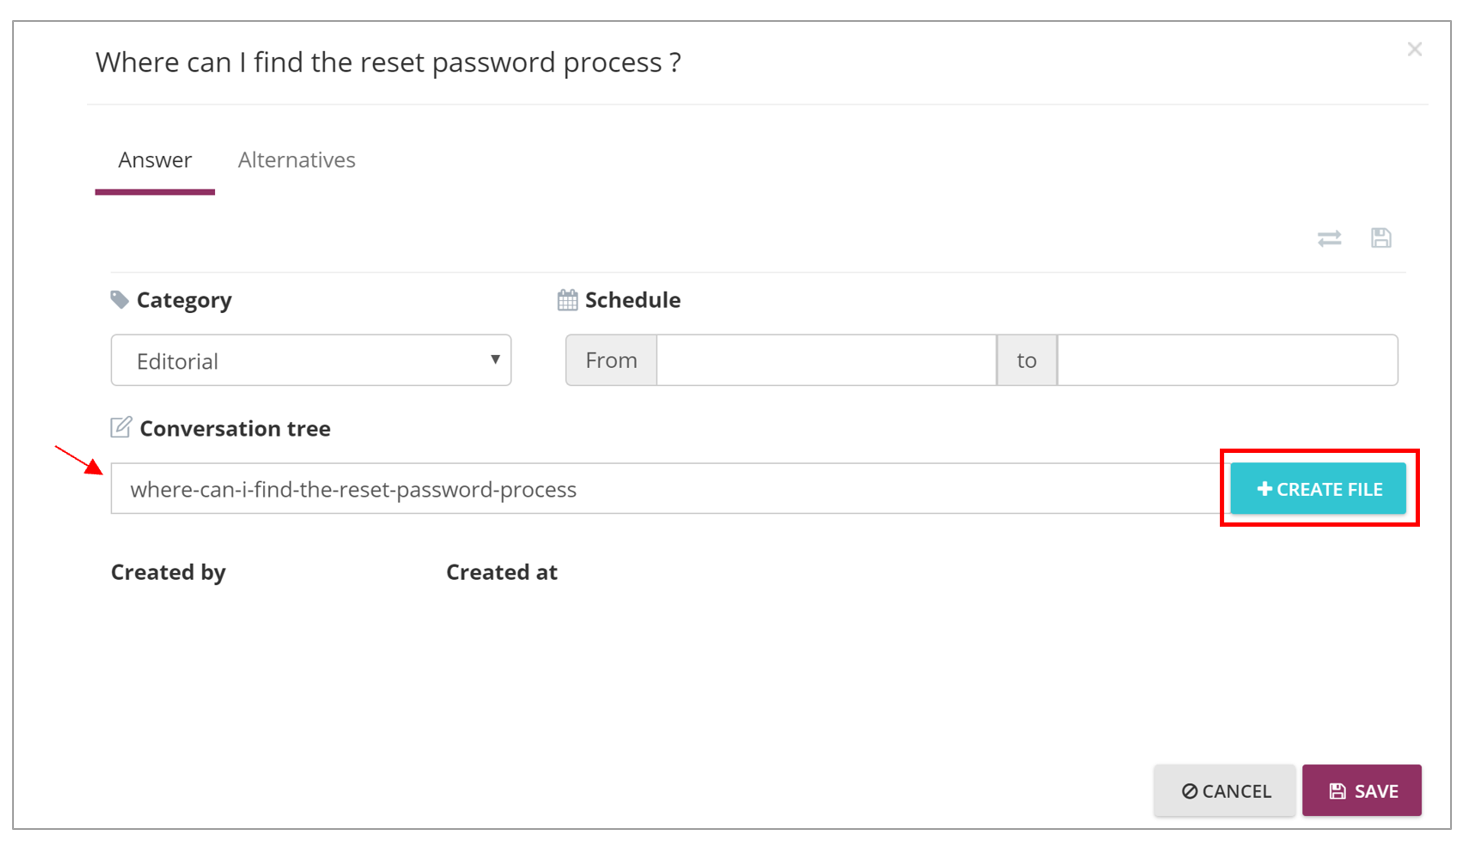
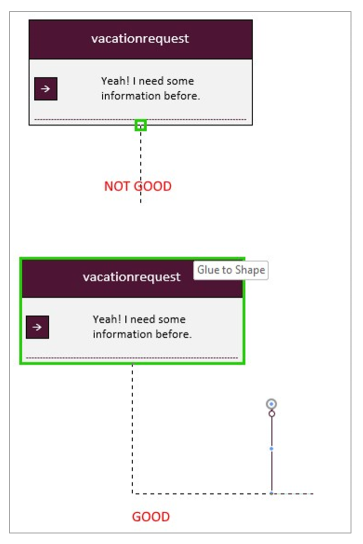
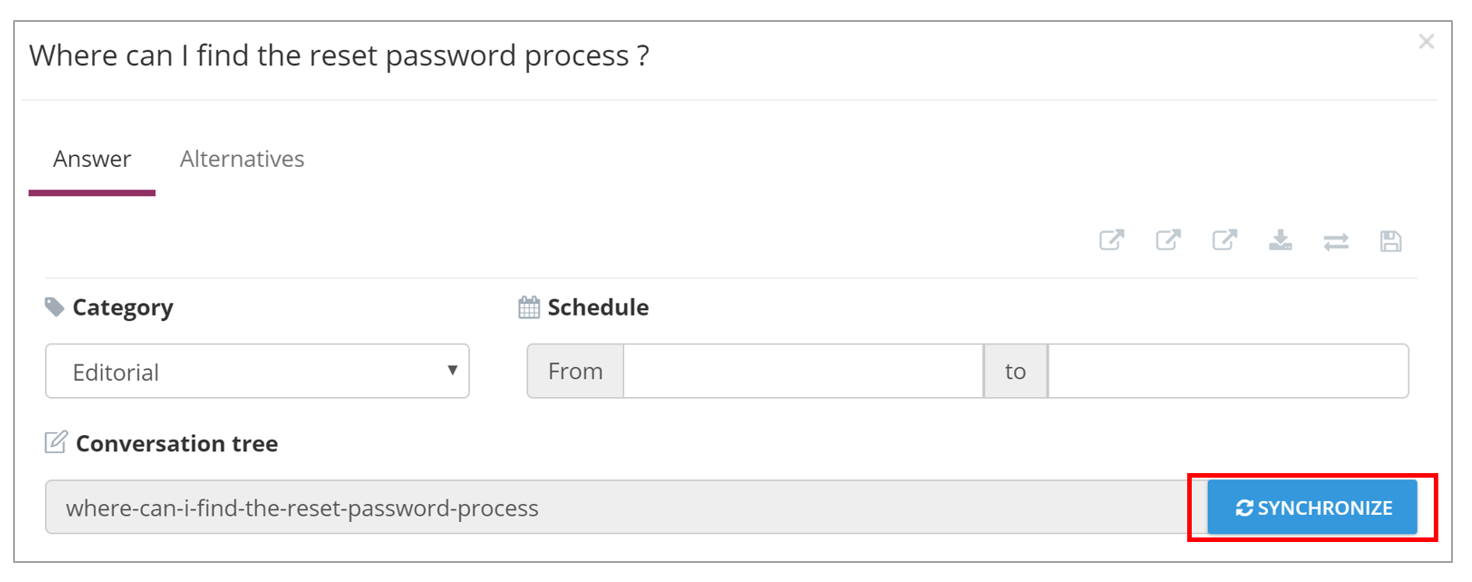
# Conversation tree
You can create a conversational tree to answer advanced requests or orders.
A conversation tree is composed of several exchanges between the chatbot and the user.
To build a conversation tree, a synchronized Visio file in the Sharepoint library in required.
- First, create a new question and choose conversation tree.
- Click on “Create file”
⚠️
Remove accents and apostrophes in the question before creating the file.
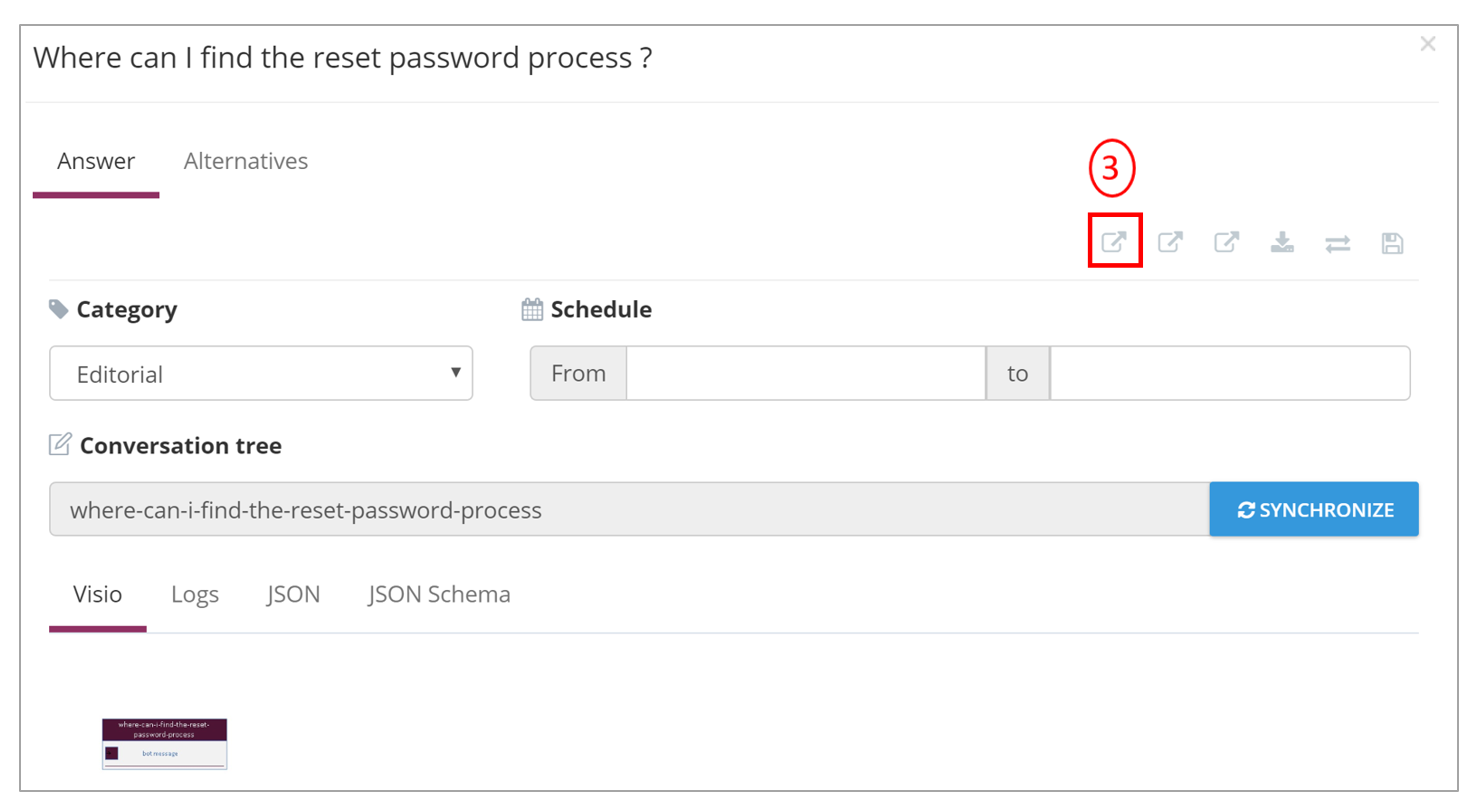
Click a second time on the question to have the preview of your Visio file (1).
⚠️
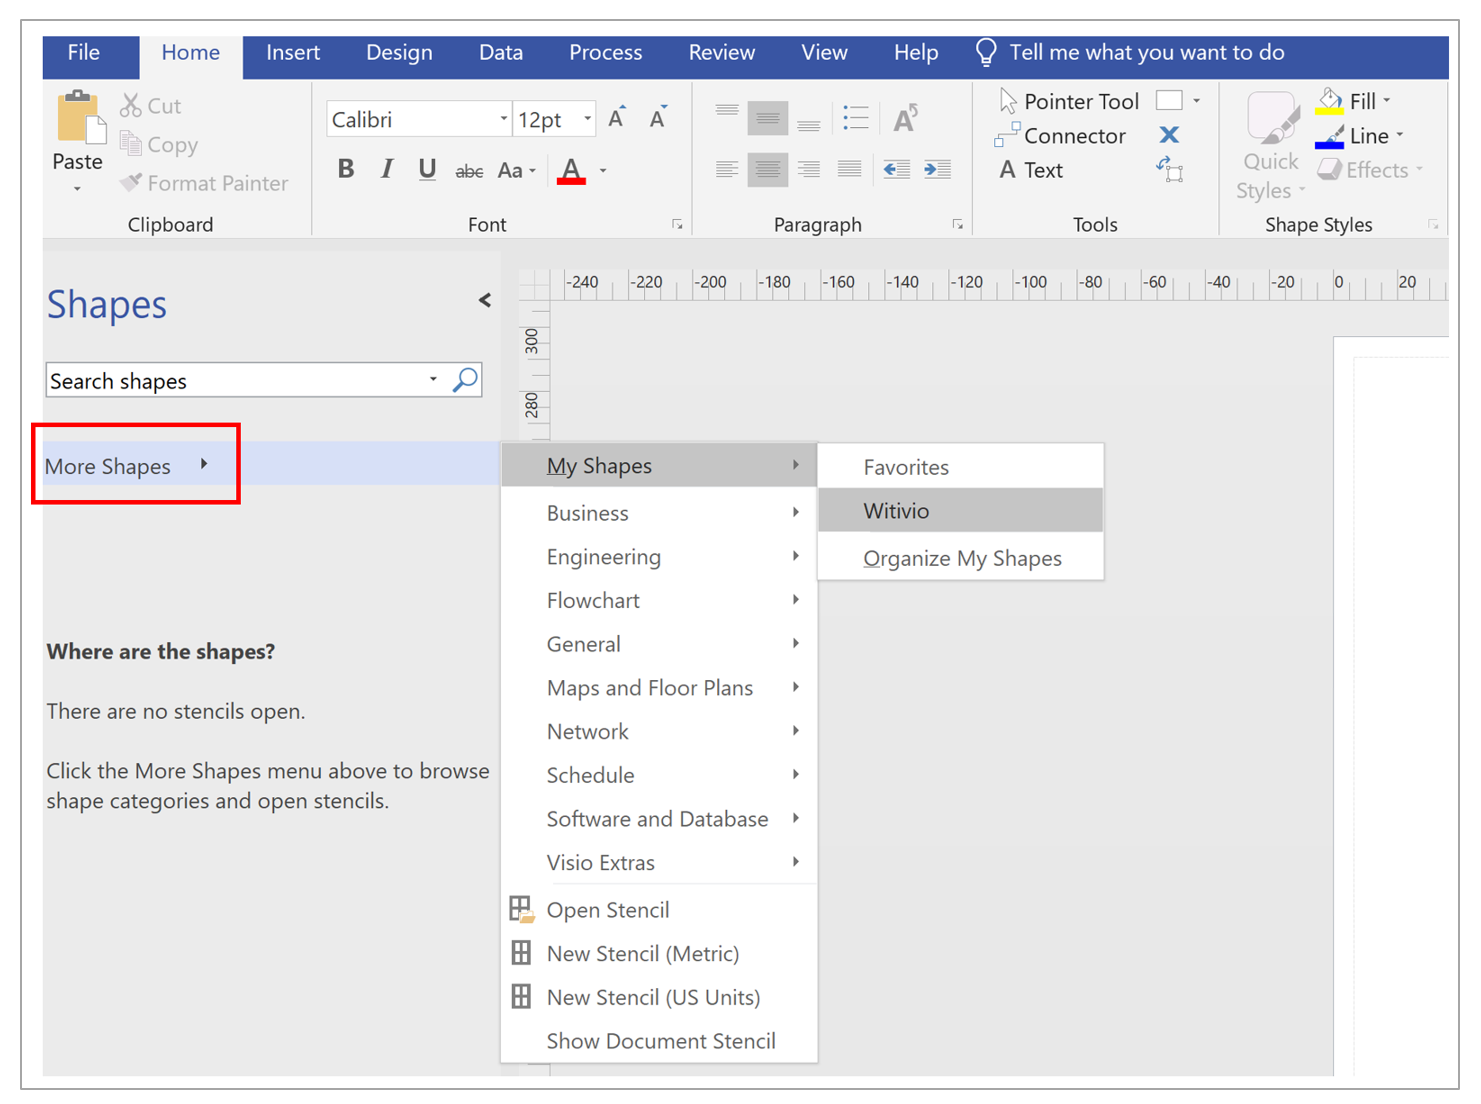
On your first time using Visio , download the Witivio Templates. To do this, click on "Download Visio stencils" (2).
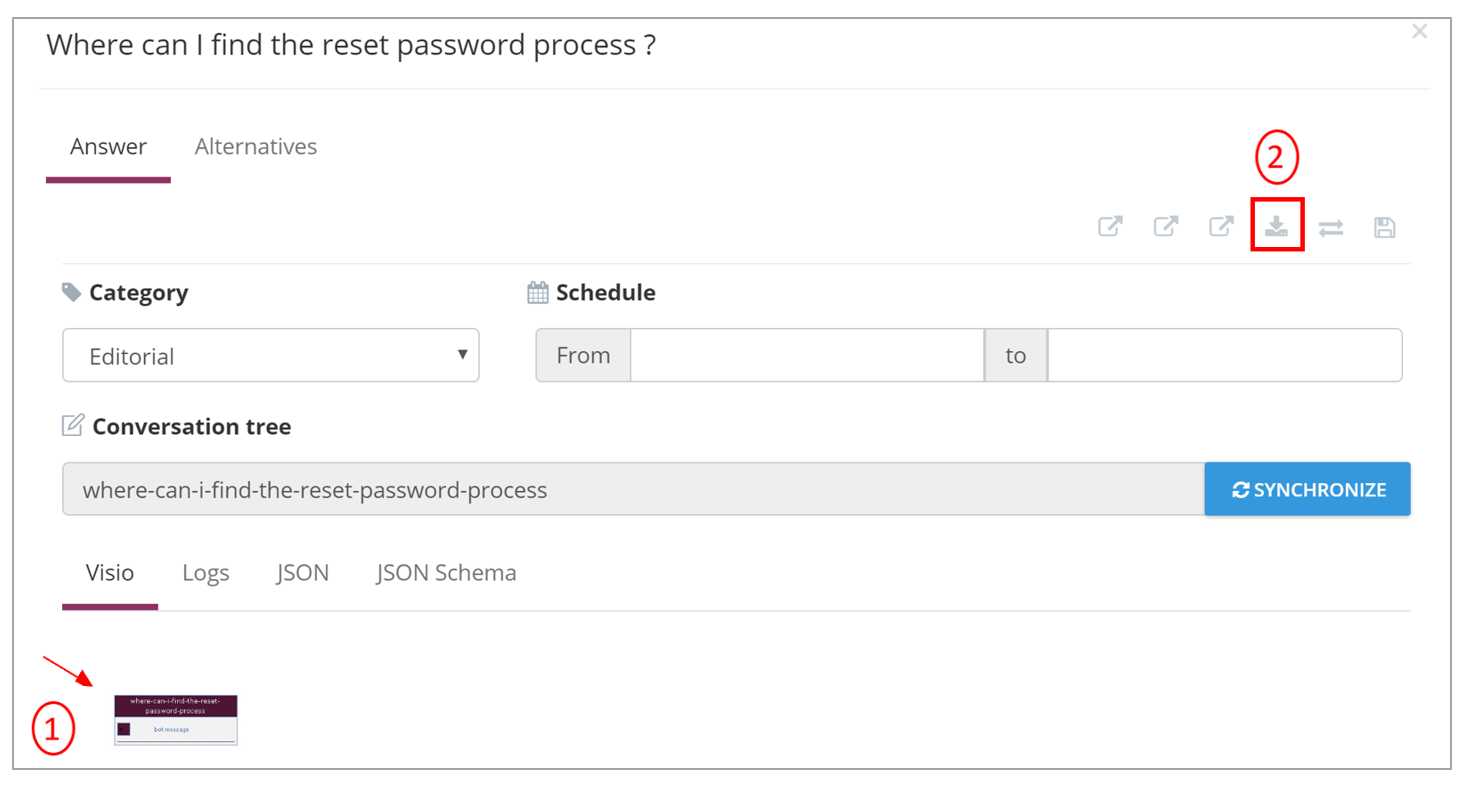
Access SharePoint to open your Visio file. To this, click on “Open SharePoint” (3).
The new question is marked with this symbol  and therefore easily recognizable.

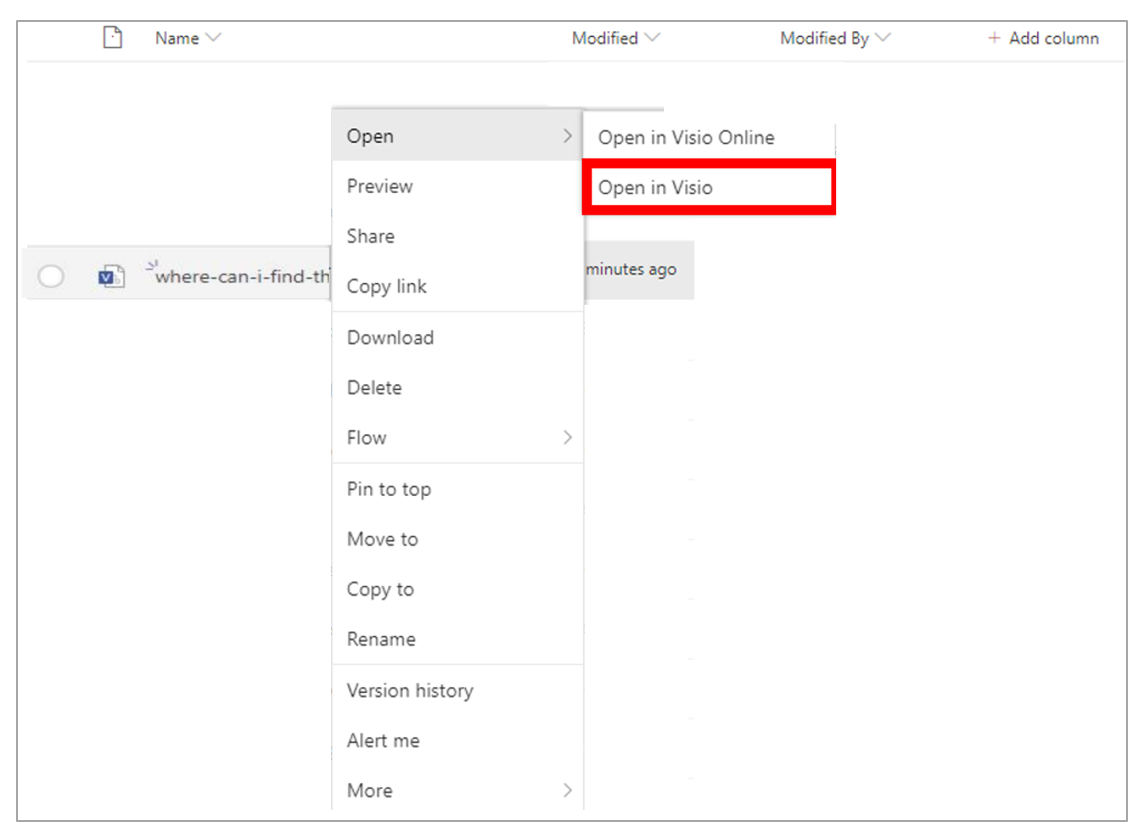
Open the file in Visio. To this, right-click on the new question, then “Open” and “Open in Visio”.
⚠️
The platform is compatible with Visio 2016 to Visio 2019 ( it is not compatible with the Visio 2013).
Before starting to create the conversation tree, you need to retrieve the Witivio stencils previsouly downloaded.
- In Visio, click on “More Shapes” > “My Shapes” > Witivio
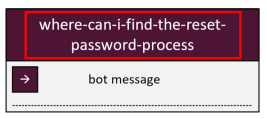
To start the conversation tree, the new question is displayed in the first shape. Each shape corresponds to a chatbot message.
This first shape is the only one with text (the question) in the colored strip.
You can now start building your tree. To this, first create your boxes.
⚠️
In case you want to add a conversation tree to your knowledge base and the latter already contains a large number of questions with simple and contextual answers, the training (i.e. synchronization) can be longer. Click on "Train" and wait until the button is greyed out, before continuing to build your knowledge.
# Witivio shape
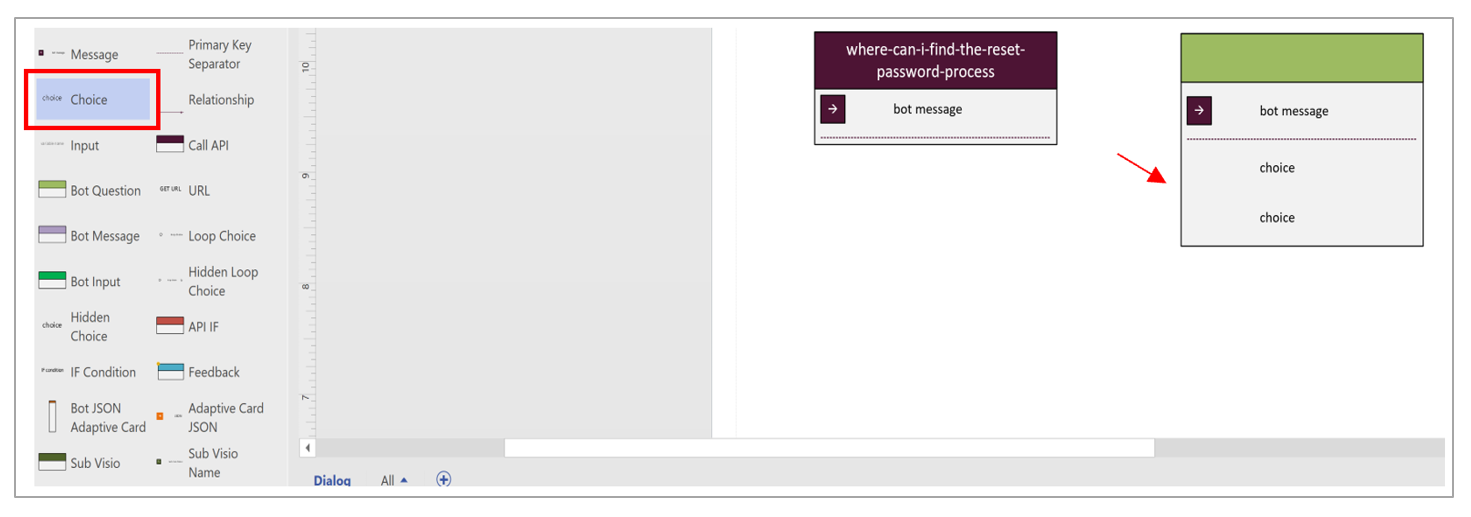
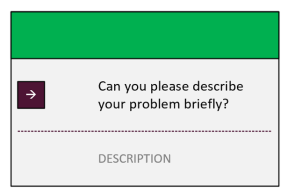
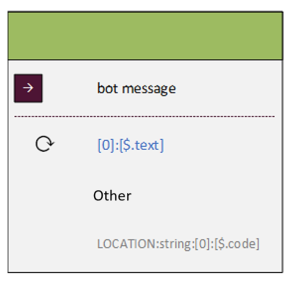
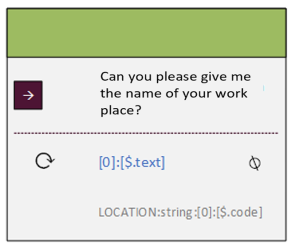
- Bot Message: this shape corresponds to a bot message
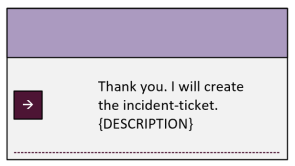
- Bot Input: The chatbot asks a question and the answer of the user will be saved in the variable
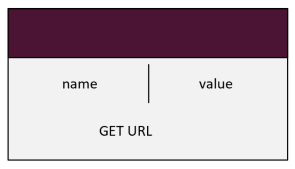
- API call: Call an API, http method (GET/POST). For example: GET URL. If there are variables, they will be sended to the API.
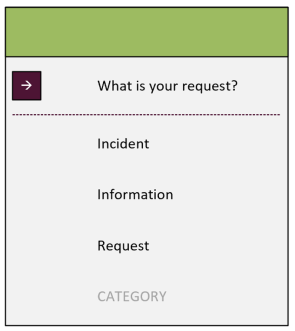
- Bot Questions: Add “Choices”. The chatbot ask the user a question with a list of choices. (Saved in “Input”).
- Bot Feedback: Add this shape to to request feedbacks from the user.
For example, if the chatbot need to ask a question to the user, add the “Bot Question” shape. First, drag and drop the shape onto the page to specify the entity and its attributes. To fill a choice, simply double-click on it. To add a new choice, drag and drop the “Choice” shape onto the “Bot Question” shape.
💡 Good practices
When using the “Bot Question” shape, it is recommanded to add a choice “Other” ou “None of this choices”, in order to allow the user.
🔴
Click here to acess all Witivio shapes which allow you create a dynamic conversation.
Once you created all the boxes you need, use the “Relationship” shape 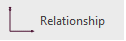 to link one shape to another.
⚠️
The green frame helps you to link boxes. To check if the relationship between the shapes is good, try to move the box.
Once you finish to draw the conversation tree, click on “Save”.
Once you saved your Visio file, synchronize it in the Witivio platform. To this, click on the question and then on “Synchronize”.
# Changing choices in conversation trees
During a conversation with the chatbot, it is possible to come back to a previous box to change and select a new choice. However, if different questions have the same answer choice, it will not be possible to change your choice in the conversation.
How to create a simple conversation tree
# Dynamic conversation
# QUESTION
- Shape: Bot Input
- Add a message
- Save in ‘’Input’’
# LIST OF CHOICES
- Shape: Bot Question
- Add ‘’Choice’’
- Save in ‘’Input’’
# DISPLAY A VARIABLE
- Shape: Bot Message
- Syntax:
{NAME OF THE VARIABLE IN THE CONVERSATION TREE}
# API Call
- Shape: API Call
- Format:
- HTTP VERB
- GET
- POST
- URL
- HTTP VERB

CALL API WITH QUERY STRING SETTINGS

# APIS FORMAT
- API HTTP / HTTPS REST
- Headers
- Witivio-apikey
- Key API value defined in Witivio 365
- Witivio-apikey
- Body
{

‘’userId’’ : ‘’user id”
‘’userProfiled’’ : ’’profil id’’,
‘’userProfileName’’ : ‘profil name’’,
‘’userName’’ : ‘’display user’s name’’,
‘’VARIABLE_NAME_1’’ : ‘’VARIABLE_VALUE_1’’,
‘’VARIABLE_NAME_2’’ : ‘’VARIABLE_VALUE_2’’

}
Back in JSON
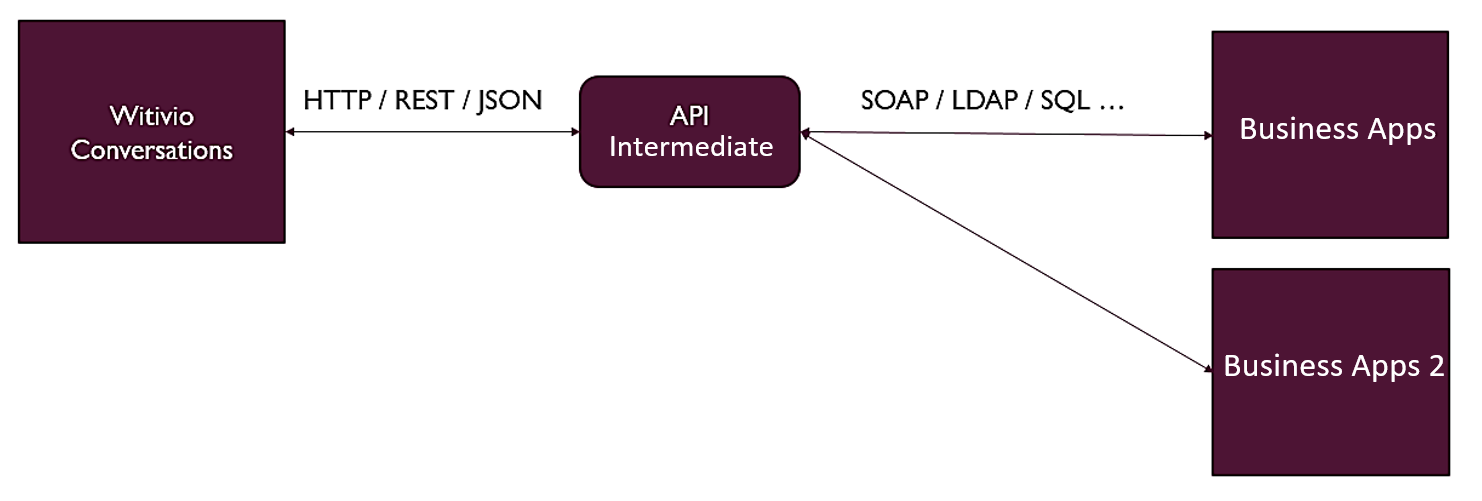
Use the Visio Http header in order to add Headers (name, value) to your API.
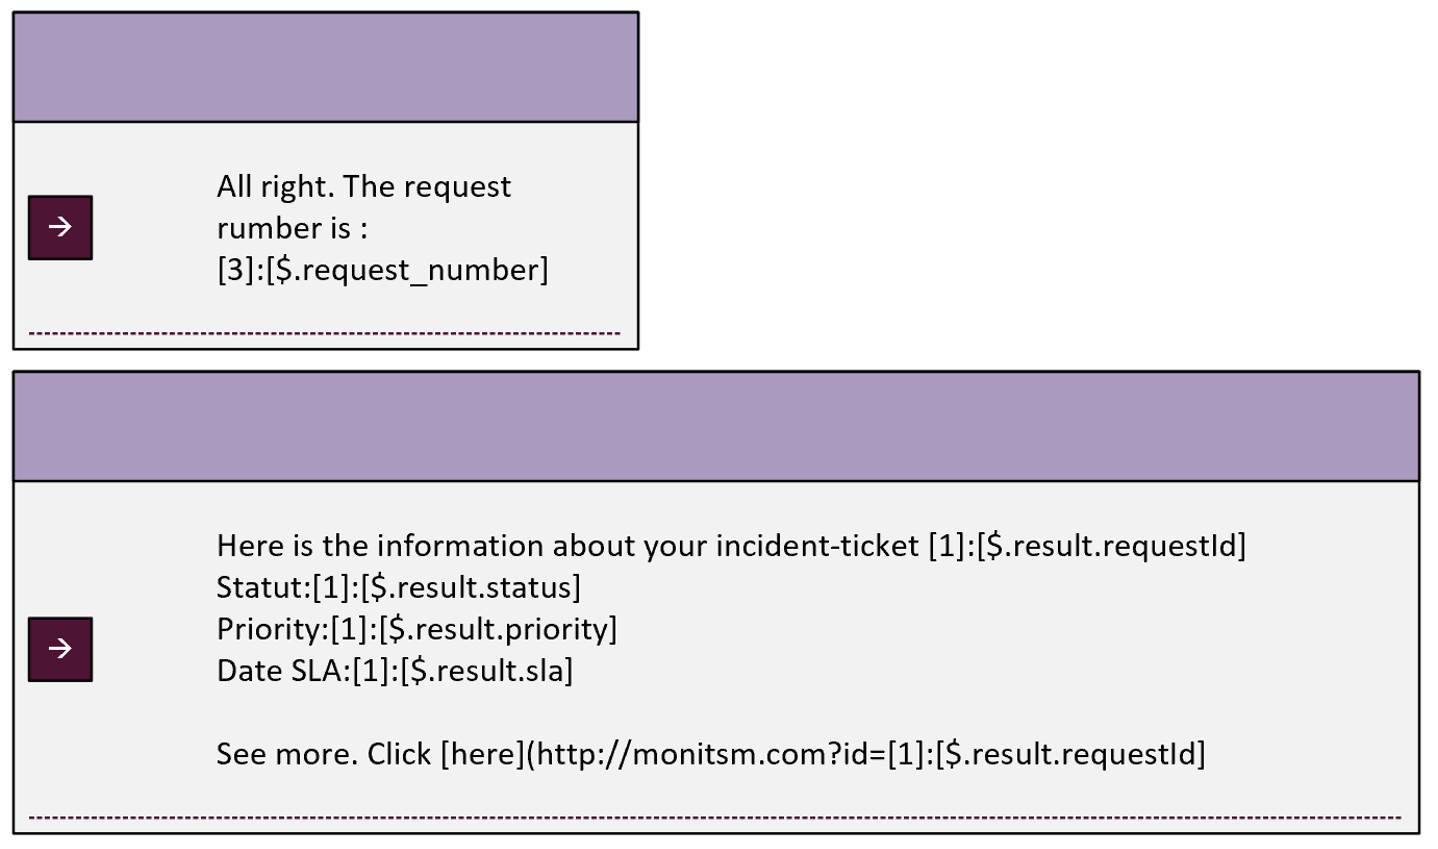
# DISPLAY API CALLBACK
- Shape: ‘’Bot Message’’
- Syntax:
[INDEX OF THE API SHAPE IN THE FLOW]
:
[JSONPATH REQUEST OF THE JSON PROPERTY]
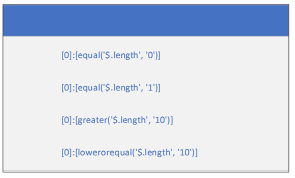
# CONDITION AND JUNCTION
- Shape ‘’API IF’’
- Add ‘’IF Condition’’
- Syntax
[INDEX OF THE API SHAPE IN THE FLOW]
:
[
Operator
equal
notequal
greater
lower
greaterorequal
lowerorequal
(
‘JSONPATH REQUEST OF THE JSON PROPERTY’
,
‘Value to compare
)
]
# LIST OF DYNAMIC CHOISES
- Shape: Bot Question
- Add ‘’Loop Choice’’
- Syntax:
[INDEX OF THE API SHAPE IN THE FLOW]
:
[JSONPATH REQUEST OF THE JSON PROPERTY]
- Save in ‘’Input’’
- Syntax:
Variable name
:
Type (string)

[INDEX OF THE API SHAPE IN THE FLOW]
:
[JSONPATH REQUEST OF THE JSON PROPERTY]
⚠️
The API call must callback a table
💾
Remember to add an output choice!
# LIST OF HIDDEN DYNAMIC CHOICES
- Shape: ‘’Bot Question
- Add ‘’Hidden Loop Choice’’
- Syntax:
[INDEX DE LA FORME API DANS LE FLUX]
:
[REQUET JSONPATH DE LA PROPRIETE JSON]7
- Save in ‘’Input’’
- Syntaxe :
Nom de la variable
:
Type (string)

[INDEX OF THE API SHAPE IN THE FLOW]
:
[JSONPATH REQUEST OF THE JSON PROPERTY]
⚠️
The API call must callback a table
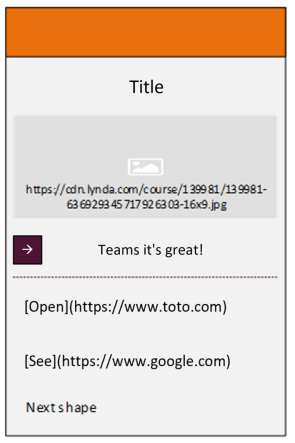
# BOT JSON ADAPTIVE CARD
- Allow to display an adaptive card from a JSO code
- Include the JSON code from https://adaptivecards.io/samples/ (opens new window) for example.
- Supported only in Teams and Webchat
# BOT IMAGE ADAPTIVE CARD
- Sub-component
- Adaptive card title
- (optional) the component may be deleted
- Image: Url of the Image (the image must be accessible without authentication)
- (optional) the component may be deleted
- Text
- Text Body
- Buttons
- Bouton to add a link : format Markdown
[Text](http://link.com) - Text only
- Which can be linked to another Visio shape
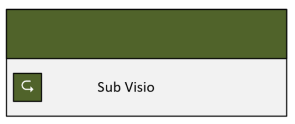
# SUB VISIO
- Allows you to call a sub visio from another tab of the same file or a conversation tree of another question
- The name of the sub visio corresponds to the title of the start shape
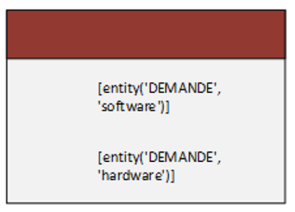
# LUIS ROLE IF
- Luis allows you to create entities that have a role.
- Example:
« I need Word » or « I need a mouse » - The question is « I need xxx »
- In the conversation tree, the path is different if the request concerns software or hardware.
- An entity named DEMAND is created and the software and hardware roles are added on it.
- The Luis Role IF shape allows you to have a different path depending on the role
- Syntax:
[entity(‘NAME_OF_ENTITY’,’NAME_OF_ROLE’)]
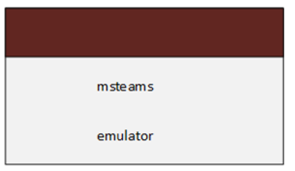
# CHANNEL IF
- Allows you to have a different path depending on the channel
- For example, it allows to send an Adaptive Card on the Teams channel or to send text on Skype.
- Channels;
- msteams
- emulator
- webchat
- directline => skype
# FEEDBACK
Drag and drop the Feedback box at the end of the conversation tree or at the end of a branch after an answer (the feedback will not be triggered in case you add the feedback shape at the end on a conversation tree escaaltion). The feedback is to be configured from the Witivio platform (Tools > Feedback).
# NEXT ESCALATION
Drag and drop this form in order to allow the chatbot to start an escalation. The escalation is to be configured from the platform (Tools > Escalation).
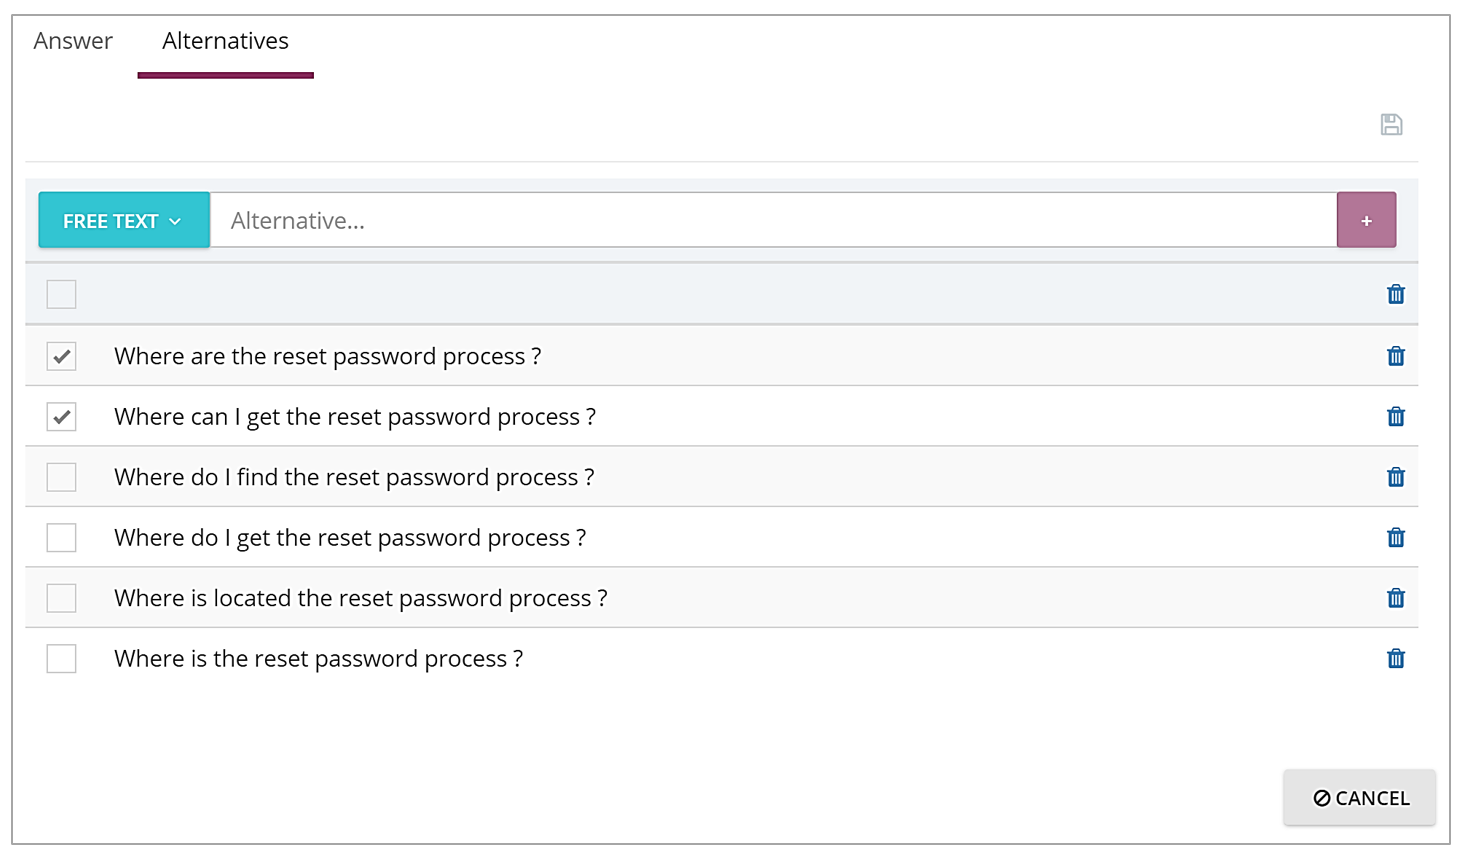
# Alternatives
An alternative is a reformulation of the principal question. The number of alternatives to a main question is displayed below on the right.

If you select a template when creating the question , it will have several alternatives automatically.
🔴
These alternatives created automatically, called "simple" alternatives are rewording of the main question, using the same words. Only users can provide the chatbot with "complex" alternatives. The latter are formulated differently but lead to the same answer.
Example :
- Main question : Where can I find the reset password process?
- Simple alternative : Where are the reset password process?
- Complex alternative : I forgot my password, how can I reset it?
💡 Good practices
A main question must have at least 5 complex alternatives and the maximum number of altenatives is 99 (simple+complex) .
Click on the altenatives to add new ones or delete. You can use Free text or templates to add alternatives. Tick one or several alternatives to delete them (trash icon).
Add Alternatives and edit the question
# Advanced Settings
# Markdown
The markdown is a text formatting syntax aimed at making richer the content of the chatbot.
💡
It is possible to put markdowns in answers and messages
- Italics: Italic
- Bold : Bold
- Header 1-5: #H1
- Link:
[bing](http://bing.com)
Image and button (beta - Webchat and Teams only)
# Image
The following code is to be added in the answer to a question:
<attachment contentType="image/jpg" title="Your title" thumbnailUrl="Your thumbnail url" contentUrl="Your url" />
# Button
The following code is to be added in the answer to a question:
<attachment contentType="button" title="Your title" link="Your link" />